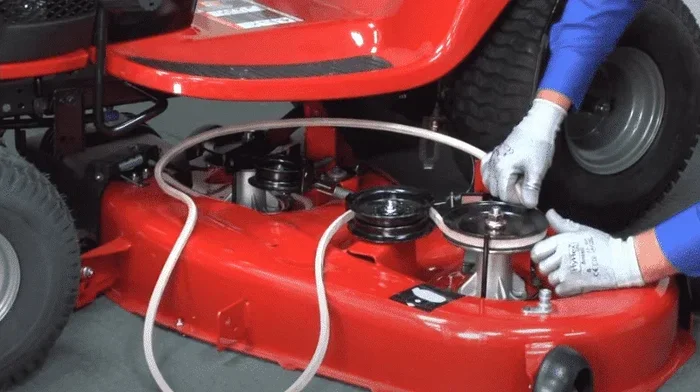
Putting a belt on a lawn mower is simpler than most homeowners think. This guide walks you through every step, from identifying the right belt type to routing it correctly and adjusting tension. You will also learn common mistakes to avoid and expert tips that make the job faster and safer.
There is something satisfying about fixing your own lawn mower. It saves money, builds confidence, and keeps your yard looking sharp. One of the most common repairs homeowners face is a worn or broken mower belt. Whether you have a push mower or a riding model, knowing how to put a belt on a lawn mower is a skill worth having.
This guide breaks down the entire process into easy, followable steps. You will learn about the different belt types, what tools you need, and how to route the belt correctly. By the end, you will feel ready to tackle this repair on your own. Let us get started.
Key Takeaways
- Know your belt type: Drive belts and mower deck belts serve different purposes and require correct sizing.
- Safety first: Always disconnect the spark plug before starting any repair on your lawn mower.
- Routing matters: Following the correct belt path prevents damage and ensures smooth operation.
- Tension is key: Proper belt tension extends the life of your mower and prevents slippage.
- Inspect while you are at it: Check pulleys, tensioners, and the deck for wear during every belt replacement.
- You can do it yourself: No professional mechanic is needed for most belt replacements.
📑 Table of Contents
- Why Belt Replacement Matters for Your Lawn Mower
- Understanding the Different Types of Mower Belts
- Tools and Materials You Will Need
- Step-by-Step Guide: How to Put a Belt on a Lawn Mower
- Common Mistakes to Avoid When Replacing a Mower Belt
- Expert Tips for Extending Belt Life
- When to Call a Professional
- Conclusion
Why Belt Replacement Matters for Your Lawn Mower
A damaged belt can cause serious problems. Your mower might lose power, stop moving, or fail to cut grass evenly. Ignoring a worn belt can lead to bigger issues like a broken pulley or a damaged mower deck. Regular maintenance keeps your machine running smoothly and extends its lifespan.
Most mower belts last between one and three seasons, depending on how often you mow and the terrain you tackle. If you notice squealing noises, visible cracking, or the belt has come off completely, it is time for a replacement. Catching the problem early saves you from more expensive repairs down the road.
Signs Your Lawn Mower Belt Needs Replacing
Watch for these warning signs that your belt is wearing out:
- Squealing or chirping sounds when the mower is running.
- Visible fraying, cracking, or glazing on the belt surface.
- The belt keeps slipping off the pulleys during use.
- Loss of cutting power or uneven grass height.
- The mower deck does not engage when you pull the lever.
- Burning rubber smell coming from the deck area.
If any of these sound familiar, do not wait. Replacing the belt early prevents further damage to the pulley system and other components.
Understanding the Different Types of Mower Belts
Not all belts are the same. Before you start the replacement, you need to know which belt your mower uses. Using the wrong belt can cause poor performance or even damage the machine. Let us look at the main types.
Drive Belts vs. Mower Deck Belts
These two belts do very different jobs in your mower:
- Drive belts connect the engine to the wheels. They are what make a self-propelled mower move forward or backward.
- Mower deck belts connect the engine to the cutting blades. They spin the blade at high speed for a clean cut.
Some mowers have both belts, while others use a single belt that handles both tasks. Check your owner manual to confirm which setup your model has. The manual also lists the correct belt size and model number you need for the replacement.
How to Find the Right Belt Size
Getting the right size is critical. A belt that is too loose will slip, and one that is too tight can strain the engine. Here is how to find the correct size:
- Check the owner manual for the recommended belt part number.
- Measure the old belt from end to end if you still have it.
- Look up the belt size on the manufacturer website.
- Visit a local hardware store and bring the old belt for comparison.
Always buy a belt made for your specific mower model. Universal belts can work, but they may not fit as precisely. The extra effort of finding the exact match pays off in performance and durability.
Tools and Materials You Will Need
Gathering everything before you start makes the job much smoother. You do not need a lot of tools, but having them ready saves time and frustration. Here is what you will need:
- Replacement belt (correct size and type for your mower)
- Socket wrench set for removing bolts and nuts
- Screwdrivers (flathead and Phillips)
- Pliers for clipping and gripping
- Safety glasses to protect your eyes
- Work gloves to protect your hands
- A clean rag for wiping down the deck
- Belt lubricant or wax to reduce friction
Having a belt routing diagram on hand is also a great idea. Many manufacturers publish these online for free. Print one out before you start so you can reference it during the installation.
Step-by-Step Guide: How to Put a Belt on a Lawn Mower
Now for the main event. Follow these steps carefully, and you will have a new belt on your mower in no time. Take your time and do not rush. Safety and accuracy matter most here.
Step 1: Disconnect the Spark Plug
Before you touch anything under the hood, disconnect the spark plug wire. This is the most important safety step. It prevents the engine from starting accidentally while you are working on it. Push the wire boot off the spark plug and tuck it away so it cannot touch the plug by mistake.
Some people skip this step, and that is a mistake. A mower can start unexpectedly, and the spinning blade or moving belt can cause serious injury. Always disconnect the spark plug first. No exceptions.
Step 2: Remove the Mower Deck
For most mowers, you need to access the belt from underneath. This usually means removing the mower deck or at least loosening it enough to get the belt off. Use your socket wrench to remove the bolts holding the deck in place.
Set the bolts and any small parts in a safe spot, like a labeled container. You do not want to lose anything. Lay the deck on a clean surface with the belt side facing up. This gives you clear access to the pulleys and the old belt.
Step 3: Remove the Old Belt
With the deck exposed, locate the old belt. Follow its path around the pulleys and note how it routes. Take a photo or sketch the path so you can reference it later. This is a small step that saves a lot of confusion.
Release any tension on the belt by pressing the tensioner or loosening the mounting bolts. Slide the belt off the pulleys carefully. Inspect each pulley for wear, damage, or debris. Clean them with a rag before installing the new belt. A dirty pulley can cause the new belt to wear out faster.
Step 4: Route the New Belt
This is the most important step. You must follow the correct belt routing path for your specific mower model. Refer to your photo, sketch, or the manufacturer diagram. Every mower has a unique path, and getting it wrong will prevent the belt from working properly.
Start by looping the belt around the largest pulley first, usually the engine crankshaft pulley. Then guide it around the smaller pulleys, tensioner, and idler wheels. Keep your hands clear of any moving parts as you route the belt. Take your time and make sure the belt sits properly in each pulley groove.
Pro tip: Applying a thin layer of belt lubricant or wax to the underside of the belt helps it slide into place and reduces friction during operation. This small step makes a big difference over time.
Step 5: Adjust the Belt Tension
Once the belt is routed correctly, you need to set the proper tension. A belt that is too loose will slip and wear out quickly. One that is too tight will strain the engine bearings and other components.
Most mowers use a spring-loaded tensioner that applies consistent pressure. If yours has an adjustable bracket, tighten it until the belt feels firm but still has a slight give when you press on it with your finger. You should be able to deflect the belt about half an inch with moderate pressure.
After adjusting, spin each pulley by hand to make sure the belt tracks correctly. It should run smooth and even without rubbing on any surrounding parts. If it wobbles or rubs, recheck the routing and alignment.
Step 6: Reassemble and Test
Now it is time to put everything back together. Reattach the mower deck, tighten all bolts, and reconnect the spark plug wire. Before you start the engine, give the belt one more visual inspection. Make sure it is seated properly on every pulley and that no tools or rags are left near the moving parts.
Start the engine and let it idle for a minute. Then engage the cutting blades or drive (depending on the belt type). Listen for any unusual sounds like squealing or grinding. Check that the blades spin freely and the mower moves smoothly.
Take the mower for a short test run on your lawn. Pay attention to how it feels and sounds. If everything runs smoothly, you did it. You successfully replaced the belt on your lawn mower.
Common Mistakes to Avoid When Replacing a Mower Belt
Even with the best instructions, mistakes happen. Here are the most common errors homeowners make during belt replacement and how to avoid them:
- Using the wrong belt size. Always double-check the part number and size before purchasing. A slightly off belt will not perform correctly.
- Skipping the spark plug disconnection. This is a safety risk. Never skip this step, no matter how simple the repair seems.
- Incorrect belt routing. Even one pulley out of place can cause the belt to fail. Always follow the routing diagram carefully.
- Over-tightening the belt. Too much tension damages bearings and the engine. A firm but slightly flexible belt is ideal.
- Forgetting to inspect pulleys. Worn or damaged pulleys can destroy a new belt quickly. Replace any damaged pulleys before installing the new belt.
- Not greasing the deck. A dirty, dry deck creates extra friction that wears out belts faster. Clean and lightly lubricate the deck during every maintenance session.
Avoiding these mistakes will make your belt replacement last longer and keep your mower running at its best.
Expert Tips for Extending Belt Life
Replacing the belt is only half the battle. Keeping it in good shape for as long as possible is what really matters. Here are some expert tips that make a real difference:
- Clean the deck after every mow. Grass clippings and debris build up under the deck and create friction. A quick rinse after each use goes a long way.
- Check belt tension monthly. A belt that slowly loosens over time will start to slip. A quick check keeps you ahead of the problem.
- Store your mower properly. Keep it in a dry, covered area. Moisture and extreme heat degrade rubber belts faster than normal use.
- Replace belts in pairs if your mower has two. If both belts are the same age, replacing them together ensures even wear and performance.
- Use genuine manufacturer belts when possible. Aftermarket belts can work, but OEM belts are designed specifically for your model and tend to last longer.
These habits might seem small, but they add up to a mower that runs better and needs fewer repairs over the years.
While You Wait for Parts
If your replacement belt has not arrived yet and you need a quick snack while you wait, frozen watermelon on a stick is a refreshing way to cool down on a hot mowing day. It is easy to make and pairs perfectly with a weekend project.
When to Call a Professional
Most belt replacements are straightforward and well within the range of a DIY repair. However, there are situations where calling a professional makes sense:
- Your mower has a complex belt system with multiple belts and pulleys that you are not comfortable working on.
- You notice damage beyond the belt, such as a cracked pulley or a bent deck shaft.
- The engine itself is making unusual noises even after the belt replacement.
- You have tried the repair and the belt still slips or makes noise, indicating a deeper issue.
A qualified small engine repair technician can diagnose problems that go beyond a simple belt swap. There is no shame in calling for help when the situation calls for it.
Fuel Up After the Job
Once your mower is back in working order, you deserve a reward. A simple creamy beans on toast is the perfect post-repair meal. It is quick, filling, and gives you the energy to tackle the rest of your yard work.
Speaking of fuel, you might also want to grab some beans on toast for later. Keeping your energy up during a day of yard maintenance is just as important as maintaining the equipment itself.
Conclusion
Learning how to put a belt on a lawn mower is one of the most useful skills any homeowner can develop. It saves money, builds self-reliance, and keeps your mower running at peak performance. With the right belt, the correct tools, and a little patience, you can complete this repair in under an hour.
Remember to always prioritize safety. Disconnect the spark plug, follow the routing diagram, and set the proper tension. Inspect your pulleys and deck while you are at it, and keep up with regular maintenance to make each belt last longer. Your mower will thank you with clean, even cuts all season long.
Now that you know the steps, grab your tools and give it a try. You might surprise yourself with how easy it really is. Once you complete your first belt replacement, you will feel confident tackling other small repairs around the house. Happy mowing!
Frequently Asked Questions
How long does it take to put a belt on a lawn mower?
For most homeowners, the entire process takes between 30 minutes and one hour. Experienced DIYers can finish even faster. The key is having the right belt and tools ready before you start.
Can I use any belt for my lawn mower?
No, you must use the correct belt size and type for your specific mower model. Using the wrong belt can cause poor performance, slipping, or damage to the engine and pulleys. Always check your owner manual for the recommended part number.
How do I know if my lawn mower belt is too loose?
If the belt visibly sags or slips off the pulleys during operation, it is too loose. You should be able to press the belt about half an inch with moderate finger pressure. If it moves more than that, the tension needs to be adjusted.
What causes a lawn mower belt to keep coming off?
The most common causes are incorrect belt routing, worn pulleys, a weak tensioner spring, or a belt that is the wrong size. Check each of these areas when troubleshooting a belt that repeatedly slips off.
Should I lubricate the new mower belt?
Yes, applying a thin layer of belt lubricant or wax to the underside of the new belt helps it seat properly and reduces friction. This simple step can significantly extend the life of the belt.
How often should I replace my lawn mower belt?
Most mower belts need replacement every one to three seasons, depending on usage and terrain. If you mow frequently or handle thick, tall grass, you may need to replace the belt more often. Inspect the belt regularly for signs of wear.