A built in grill outdoor kitchen turns your backyard into a year-round cooking and entertaining hub. Whether you prefer gas, charcoal, or a smoker combo, a permanent outdoor setup adds serious value to your home and your lifestyle. In this guide, you will find inspiring designs, practical build tips, budget breakdowns, and expert advice to help you create the outdoor kitchen of your dreams.
Key Takeaways
- Boosts home value: A well-designed built in grill outdoor kitchen can increase property value by up to 10 percent.
- Endless design options: From modern minimalism to rustic stone, there is a style for every backyard and budget.
- Smart materials matter: Granite, concrete, and stainless steel are top picks for durability and easy maintenance.
- Plan for function first: Layout, ventilation, and countertop space make or break your outdoor cooking experience.
- Budget-friendly options exist: You can build a stunning setup for under $3,000 with smart material choices.
- Regular upkeep keeps it looking great: Simple seasonal maintenance extends the life of your outdoor kitchen by many years.
📑 Table of Contents
- Why a Built In Grill Outdoor Kitchen Changes Everything
- Popular Built In Grill Outdoor Kitchen Designs
- Key Features to Include in Your Built In Grill Setup
- Materials and Budget Considerations
- Step-by-Step Guide to Building Your Outdoor Kitchen
- Maintenance Tips for Long-Lasting Performance
- Common Mistakes to Avoid
- Expert Insights on Outdoor Kitchen Design
- Final Thoughts
Why a Built In Grill Outdoor Kitchen Changes Everything
Imagine stepping outside and walking straight to a fully equipped cooking station. No dragging the grill out of the garage. No setting up portable tables. A built in grill outdoor kitchen makes all of that disappear.
More than just a grill, a permanent outdoor setup becomes the heart of your backyard. It is where you host weekend barbecues, celebrate holidays, and enjoy quiet evenings with a glass of wine. People who invest in outdoor kitchens spend more time outside. That is a fact backed by real estate data and lifestyle studies alike.
The beauty of a built in setup is its permanence. Unlike a portable grill that gets shoved in a corner after summer, this is a fixed structure designed to last. You customize every detail. The countertop height. The burner configuration. The storage underneath. It all fits your space and your cooking style perfectly.
Outdoor cooking also opens up your menu. You are not limited to burgers and hot dogs. Think smoked ribs, grilled vegetables, wood-fired pizza, and even breakfast cooked outside on a cool morning. The possibilities expand when you have a dedicated outdoor kitchen station.
Let us dive into the designs, materials, and practical steps that will help you build the outdoor kitchen you have always wanted. Whether you are a weekend griller or a serious pitmaster, this guide covers it all.
Popular Built In Grill Outdoor Kitchen Designs
Not all outdoor kitchens look the same. Your design should match your home’s architecture, your backyard size, and your personal style. Here are the most popular directions homeowners take right now.
Modern Minimalist
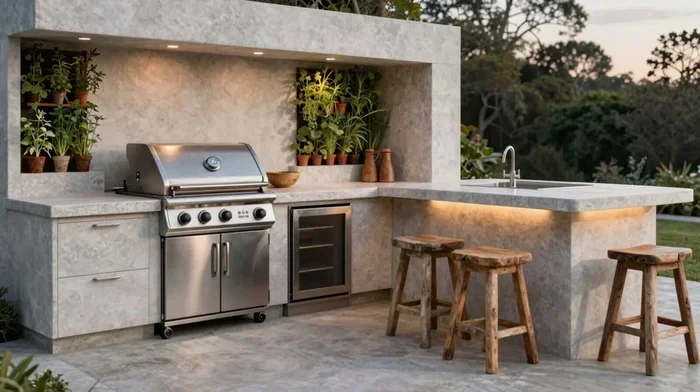
This style favors clean lines, flat panels, and a monochromatic color palette. Think stainless steel counters, a sleek gas grill built into a floating stone shelf, and hidden storage. The modern look emphasizes function without clutter. It works beautifully in contemporary homes with large patios or rooftop decks.
Key features include recessed lighting, flush-mounted burners, and a simple backslash made of concrete or glass tile. The goal is to let the grill and the space breathe. Nothing feels bulky or unnecessary.
Rustic Farmhouse
If you love the warmth of natural materials, the farmhouse style is for you. This design uses stacked stone, reclaimed wood, and wrought iron accents. A brick grill surround gives it that classic backyard charm.
Rustic outdoor kitchens often include a wood-fired pizza oven alongside the main grill. Think open shelving for cast iron cookware and a thick butcher-block countertop for prep work. This style feels cozy and inviting, perfect for family gatherings and casual entertaining.
Mediterranean Inspired
Mediterranean-style outdoor kitchens bring warmth and elegance. Terracotta tiles, arched openings, and stucco walls create a resort-like atmosphere. These setups often feature a large grilling area with a side station for preparing fresh salads and appetizers. In fact, many Mediterranean grill masters love preparing dishes like a Greek salad in a jar right in their outdoor kitchen, making it easy to serve healthy sides alongside grilled mains. The combination of a charcoal grill and a prep island creates a true entertainer’s setup.
Compact Corner Kitchen
Not everyone has a huge backyard. A compact corner kitchen fits neatly into unused spaces. It typically includes a small grill, a sink, and a narrow counter. Even in a tight footprint, you can create a functional and attractive outdoor cooking area. This design works especially well for townhouses, small patios, and apartment balconies with enough space.
Key Features to Include in Your Built In Grill Setup
A great outdoor kitchen is more than just a grill. The best setups include thoughtful features that make cooking and entertaining effortless. Here is what to consider when planning your space.
Countertop Space
You need room to prep food, place tools, and set out dishes. A minimum of 36 inches of continuous counter space on one side of the grill is ideal. If your budget allows, add an island or a peninsular prep station. This gives you workspace on both sides of the grill and makes the whole area feel generous.
Storage and Cabinetry
Outdoor kitchen cabinets keep your grilling tools, spices, and accessories organized and protected from the elements. Choose weather-resistant materials like marine-grade plywood with waterproof finishes. Drawers work better than doors because they are easier to access while you are cooking.
Ventilation and Hood
A built in hood or downdraft ventilation system is essential. It pulls smoke and grease away from your cooking area. Without proper ventilation, smoke drifts into your seating area and lingers on your furniture and clothes. A good hood also reduces grease buildup on your stone or brick surfaces.
Sink and Water Source
An outdoor sink makes cleanup so much easier. You can rinse vegetables, wash dishes, and wipe down surfaces without running inside. Some homeowners add a small refrigerator or ice maker nearby for cold drinks and perishables.
Lighting
Outdoor cooking does not stop when the sun goes down. Recessed LED lights under countertops, string lights overhead, and task lighting near the grill keep your space usable well into the evening. Good lighting also adds to the ambiance and makes your backyard feel like an extension of your indoor living space.
Materials and Budget Considerations
Choosing the right materials is one of the most important decisions in building your outdoor kitchen. Materials affect durability, appearance, maintenance, and cost. Let us break down the most common options.
Granite and Natural Stone
Granite is a top choice for outdoor countertops. It withstands heat, resists scratches, and looks stunning. Natural stone like limestone and travertine adds a luxurious, organic feel. The downside is cost. Quality granite can run $60 to $120 per square foot installed. Stone surfaces also need sealing once or twice a year to prevent staining.
Concrete and Cast Stone
Concrete is budget-friendly and incredibly versatile. You can pour custom countertops in any shape or color. Stamped concrete mimics the look of natural stone at a fraction of the price. Concrete counters typically cost between $40 and $80 per square foot. They are durable but can crack over time if not properly sealed.
Stainless Steel
Stainless steel gives your outdoor kitchen a sleek, professional look. It is heat-resistant, easy to clean, and built to last. However, stainless steel shows fingerprints and scratches more easily than other materials. Budget about $30 to $60 per square foot for steel countertops. Many grill enthusiasts prefer steel for its industrial aesthetic and practical performance.
Tile and Brick
Ceramic or porcelain tile works well for backsplash and accent areas. Brick is excellent for grill surrounds and gives a classic, timeless appearance. Both materials are affordable and easy to repair if damaged. Tile costs range from $10 to $40 per square foot depending on the style.
Budget Breakdown
Your total cost depends on size, materials, and features. Here is a rough guide to help you plan.
| Setup Level | Estimated Cost | What You Get |
|---|---|---|
| Basic | $1,500 – $3,000 | Grill, simple counter, minimal storage |
| Mid-Range | $3,000 – $8,000 | Granite counters, hood, sink, cabinets |
| Premium | $8,000 – $20,000+ | Full kitchen island, stone surround, high-end grill, lighting, refrigeration |
Remember that a built in grill outdoor kitchen pays for itself over time. Home appraisers consistently rank outdoor kitchens among the top features buyers look for. Even a basic setup adds noticeable curb appeal and resale value.
Step-by-Step Guide to Building Your Outdoor Kitchen
Building a permanent outdoor kitchen is a rewarding project. You do not need to be a professional contractor, but you should approach it with a plan. Here is a step-by-step roadmap.
Step 1: Choose Your Location
Pick a spot that is downwind from your seating area so smoke blows away from guests. Ensure there is easy access to your gas line or electrical panel. Consider proximity to your indoor kitchen for carrying supplies outside. A location that is sheltered from wind but open enough for good airflow works best.
Step 2: Design Your Layout
Sketch your layout on paper or use a free online design tool. Include the grill, countertops, storage, and any extra features like a sink or pizza oven. Think about the work triangle: grill, prep area, and serving station. A logical flow makes cooking outdoors feel natural and efficient.
Step 3: Build the Base Structure
Start with a solid foundation. Concrete blocks or poured concrete footings support the weight of your outdoor kitchen. Build the frame for cabinets and counters using pressure-treated lumber or steel framing. Make sure everything is level and square before moving forward.
Step 4: Install Utilities
Run your gas line, electrical wiring, and plumbing before you close up walls and counters. Hire a licensed professional for gas and electrical work if you are not experienced. This step is not something you want to skip or DIY unless you have the proper skills and permits.
Step 5: Install Countertops and Surfaces
Once the structure is solid, install your chosen countertop material. Seal natural stone before use. Make sure granite or concrete is properly supported to prevent cracking. Attach backsplash material to protect walls from grease and heat.
Step 6: Add Finishing Touches
Install your grill, add hardware for doors and drawers, mount lighting, and set up your outdoor sink. Place tools, spices, and accessories in their new home. Step back and admire your work.
For those who love cooking outdoors from morning to night, consider adding a breakfast station. Imagine making a hearty outdoor brunch with dishes like eggs in purgatory fresh from a portable oven right in your permanent outdoor setup. It is the kind of detail that turns a good outdoor kitchen into a great one.
Maintenance Tips for Long-Lasting Performance
Your built in grill outdoor kitchen will last for years with proper care. Regular maintenance protects your investment and keeps everything looking and working its best.
- Clean after every use. Brush grates, wipe down counters, and empty grease traps. This prevents buildup and keeps your grill performing well.
- Season your grill grates. After cleaning, apply a thin layer of oil to prevent rust and sticking. This simple habit extends grate life significantly.
- Seal natural stone annually. Granite, limestone, and travertine need sealing to resist stains and moisture. A good sealant lasts about 12 months.
- Check gas connections regularly. Inspect hoses and fittings for leaks or wear. Use soapy water to test connections bubbles indicate a leak that needs immediate attention.
- Cover or shelter your outdoor kitchen. A quality cover or a pergola overhead protects surfaces from rain, sun, and debris. This is especially important for wood and metal components.
- Tighten hardware and re-caulk. Over time, screws loosen and caulk cracks. Inspect your kitchen seasonally and address small issues before they become big problems.
Taking care of your outdoor kitchen does not take much time. A few minutes after each cook and a few hours each season keep everything in excellent shape. The result is an outdoor space that looks great and performs beautifully for many years.
Common Mistakes to Avoid
Even the best-planned projects can run into trouble. Here are mistakes homeowners make when building a built in grill outdoor kitchen and how to avoid them.
- Skipping the permit. Many municipalities require permits for outdoor kitchen construction. Check with your local building department before you start. Ignoring this can lead to fines and forced removal.
- Underestimating ventilation needs. Without proper airflow, smoke fills your yard and your home. Install a hood or position your grill where natural breezes carry smoke away.
- Choosing the wrong grill size. Measure your space carefully before buying a grill. A grill that is too large overwhelms the area. One that is too small limits your cooking capacity.
- Using indoor materials outdoors. Standard wood, drywall, and painted surfaces do not hold up to weather. Always choose materials rated for outdoor use.
- Forgetting about seating. Your outdoor kitchen needs a comfortable place to sit and eat nearby. Plan your patio furniture layout alongside your kitchen design.
Avoiding these pitfalls saves you time, money, and frustration. A little planning goes a long way toward a successful outdoor kitchen project.
Expert Insights on Outdoor Kitchen Design
We spoke with several landscape architects and outdoor kitchen designers to gather their top advice for homeowners planning a built in grill outdoor kitchen.
“The biggest mistake we see is treating the outdoor kitchen as an afterthought,” says Maria Torres, a certified outdoor kitchen designer with over 15 years of experience. “It should be part of your overall backyard plan from day one. The best outdoor kitchens flow naturally from the indoor living space and extend the home’s footprint outdoors.”
Another expert, James Whitfield, a general contractor specializing in outdoor living spaces, emphasizes the importance of infrastructure. “People fall in love with the aesthetics but forget about gas lines, electrical capacity, and drainage,” he explains. “Get those basics right first. The beautiful parts are easy once the foundation is solid.”
Both experts agree on one thing: start with a clear budget and a realistic timeline. Rushing the process leads to compromises. Taking your time ensures a result you will love for years.
Final Thoughts
A built in grill outdoor kitchen is one of the best investments you can make in your home and your lifestyle. It brings people together. It expands your living space. It adds real value to your property. Whether you choose a simple setup or a fully loaded outdoor kitchen with every luxury feature, the payoff is immediate and lasting.
Start with a solid plan. Pick a design that reflects your style. Choose durable materials that suit your budget. Follow the steps outlined in this guide, and you will have an outdoor cooking space you will love for years to come. Your backyard deserves to be more than just a patch of grass. Give it purpose. Give it style. Build the outdoor kitchen you have always dreamed of.
Frequently Asked Questions
What is the average cost of a built in grill outdoor kitchen?
The average cost ranges from $1,500 for a basic setup to $20,000 or more for a premium outdoor kitchen. Most homeowners spend between $3,000 and $8,000 for a mid-range design that includes a grill, countertops, storage, and a hood. Your final cost depends on materials, size, and features.
Can I build a built in grill outdoor kitchen myself?
Yes, many homeowners successfully build their own outdoor kitchens. However, you should hire licensed professionals for gas and electrical work. If you have solid DIY skills and the right tools, you can handle the construction, countertop installation, and finishing touches yourself.
What grill type works best for a built in setup?
Gas grills are the most popular choice for built in outdoor kitchens because of their convenience and consistent heat control. However, charcoal grills and pellet smokers are also excellent options. Many homeowners choose a dual-fuel setup with a gas grill and a side smoker for maximum versatility.
How long does it take to build a built in grill outdoor kitchen?
A basic outdoor kitchen takes about one to two weekends. A mid-range setup with countertops and cabinetry typically takes two to four weeks. Premium designs with multiple features can take six to twelve weeks from start to finish. Permits and material availability also affect the timeline.
Does a built in grill outdoor kitchen increase home value?
Yes. Outdoor kitchens consistently rank among the top features that boost home resale value. Real estate experts estimate a well-built outdoor kitchen can recover 70 to 80 percent of its cost at resale. Some appraisers value outdoor kitchens at 5 to 10 percent of the overall home value increase.
What materials are best for outdoor kitchen countertops?
Granite, concrete, and stainless steel are the top three choices. Granite offers natural beauty and heat resistance. Concrete is affordable and customizable. Stainless steel is sleek, durable, and easy to clean. Each material has trade-offs in cost, maintenance, and appearance, so choose based on your priorities.
=== CONCLUSION ===
A built in grill outdoor kitchen transforms your backyard into a true living space. It is where meals become experiences and ordinary weekends turn into memorable gatherings. From choosing the right design and materials to following a smart build plan, every decision you make brings you closer to the outdoor kitchen of your dreams.
Start planning today. Even small steps lead to big results. Your future self will thank you every time you fire up the grill in your beautiful, functional outdoor space.