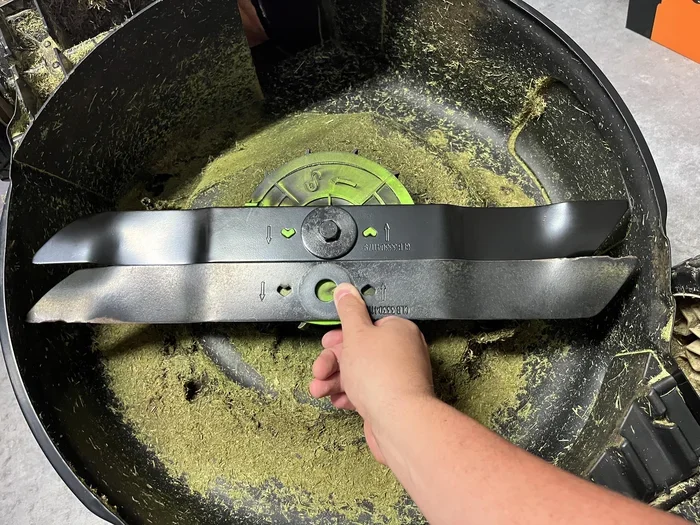
Learning how to replace lawn mower blade is one of the easiest ways to keep your yard looking its best. A dull blade tears grass instead of cutting it, leading to brown tips and disease. With the right tools and a little patience, you can complete this lawn mower blade replacement in under 30 minutes. This guide walks you through every step safely and clearly. You will walk away with a sharp blade and the confidence to handle future maintenance on your own.
Your lawn mower blade takes a beating every time you push the machine across the yard. Grass, rocks, roots, and debris all wear down the cutting edge over time. When the blade gets dull, it stops slicing cleanly and starts tearing the grass instead. That tearing leaves brown tips and opens the door to disease. Many homeowners ignore this problem until the lawn starts looking rough and unhealthy.
The good news is that how to replace lawn mower blade is a straightforward task. You do not need to be a professional mechanic or a seasoned gardener. With a few basic tools and about half an hour, you can swap out a worn blade for a fresh one. This guide breaks down the entire process into simple, easy-to-follow steps. Whether you own a push mower, a riding mower, or a zero-turn, the basics stay the same.
Replacing your own blade also saves you money. A professional lawn mower repair shop might charge you fifty to one hundred dollars for a simple blade swap. Do it yourself, and you pay only for the new blade. Plus, you gain the satisfaction of handling your own lawn mower maintenance. Let us get into the details of how to do this safely and correctly.
Key Takeaways
- Safety comes first: Always disconnect the spark plug before starting any lawn mower blade replacement.
- Know your blade type: Standard, mulching, and lifting blades serve different purposes. Choose the right one for your lawn care goals.
- Balance matters: An unbalanced blade causes vibration and damages your mower over time.
- Sharpen regularly: Replacing the blade is only half the battle. Sharpening your mower blade every 20 to 25 hours of use keeps cuts clean.
- Avoid common mistakes: Installing the blade upside down or skipping the washer can ruin your lawn and your equipment.
- Maintenance extends life: Proper cleaning and storage of your new blade adds months or even years to its lifespan.
📑 Table of Contents
- Why Replacing Your Lawn Mower Blade Matters
- Tools and Materials You Will Need
- Step-by-Step Guide to Replacing Your Lawn Mower Blade
- How to Choose the Right Replacement Blade
- Common Mistakes to Avoid When Replacing a Lawn Mower Blade
- Maintaining Your New Blade for Longevity
- When to Call a Professional for Lawn Mower Repair
- Final Thoughts
Why Replacing Your Lawn Mower Blade Matters
Signs Your Blade Needs Replacement
Not sure if your blade needs replacing? Look for these clear signs. First, check your lawn after mowing. If you see ragged, torn grass tips instead of clean-cut ends, the blade is dull. Second, the mower leaves behind uncut strips of grass. This happens when the blade can no longer slice through the grass effectively. Third, you notice the mower vibrating more than usual. A chipped or bent blade throws off the balance. Fourth, the grass looks brown and unhealthy even after a fresh mow. Torn grass blades cannot absorb water and nutrients properly.
The Impact of a Dull Blade on Lawn Health
A dull blade does more than just look bad. It actually harms your lawn. When the blade tears instead of cuts, it creates open wounds on the grass blades. These wounds invite fungal diseases and pests. Brown patch, dollar spot, and other common lawn diseases thrive on damaged grass. Your lawn also struggles to recover from mowing stress. Over time, a neglected blade can turn a healthy green lawn into a patchy, weak-looking yard. Regular lawn mower blade replacement keeps your grass strong and disease-resistant.
Tools and Materials You Will Need
Essential Tools for the Job
Before you start, gather everything you need. Having the right tools makes the job faster and safer. Here is what you will need:
- Socket wrench set – to loosen the mower blade bolt
- Blade wrench – a specialized tool that fits most mower blade nuts
- Pliers or locking pliers – to hold the blade steady
- Rubber mallet – to gently tap the blade free if it is stuck
- Wire brush or steel wool – to clean the mower deck
- New replacement blade – make sure it matches your mower model
- Anti-seize lubricant – for the blade bolt threads
- Clean rag or shop towel – for wiping down parts
Safety Equipment You Should Wear
Lawn mower safety is not something to take lightly. A mower blade spins at thousands of revolutions per minute. Even when the engine is off, the blade can still be sharp enough to cause a serious cut. Always wear thick work gloves to protect your hands. Safety glasses shield your eyes from debris. Steel-toed boots are a smart choice, especially if you are working on a riding mower. Do not skip these precautions, even if the job seems simple.
Step-by-Step Guide to Replacing Your Lawn Mower Blade
Step 1: Prepare the Mower
Safety starts before you touch any tools. First, disconnect the spark plug. This prevents the engine from starting accidentally while you are working. Pull the spark plug wire off the plug and tuck it away where it cannot touch the plug. Next, turn the mower on its side. If you have a riding mower, use a jack stand or ramps to lift the deck off the ground. Place the mower on a flat, stable surface. Lay down a piece of cardboard or a drop cloth to protect the driveway or lawn from oil leaks.
Quick Tip: If your mower has a fuel tank, drain it partially or tilt the mower with the air filter facing up. This prevents fuel from leaking into the carburetor or air filter.
Step 2: Remove the Mower Deck (If Necessary)
Some mowers allow you to access the blade without removing the entire deck. Check your owner manual first. If your model requires deck removal, start by disconnecting the drive belt or any linkage rods. Remove the bolts that secure the deck to the frame. Set aside all hardware in a labeled container so reassembly is easy. Removing the mower deck gives you full access to the blade and the underside of the deck, which is important for thorough cleaning.
Step 3: Detach the Old Blade
Now it is time to remove the old blade. Use your blade wrench or socket wrench to loosen the mower blade bolt. Remember, most mower blade bolts have a reverse thread, meaning you turn them clockwise to loosen. Hold the blade steady with pliers or your gloved hand to prevent it from spinning. If the bolt is rusted or stuck, spray it with penetrating oil and wait a few minutes before trying again.
Once the bolt is loose, carefully lift the blade off the blade adapter. The adapter sits between the blade and the engine crankshaft. Note how the blade sits on the adapter so you can reinstall the new one correctly. Clean any grass clippings or rust from the adapter using a wire brush.
Step 4: Install the New Blade
Take your new lawn mower blade out of the packaging. Check that it matches the old blade in size and shape. The mower blade center hole should align with the adapter. Place the new blade onto the adapter with the cutting edge facing the ground. On most mowers, the label or writing on the blade faces up toward the engine.
Slide the blade all the way down onto the adapter shaft. Thread the mower blade nut onto the bolt by hand first. Then use your wrench to tighten it securely. Remember to turn counterclockwise for most standard threads. Do not over-tighten, but make sure the blade does not wiggle or spin freely. Apply a thin coat of anti-seize lubricant to the bolt threads before installation. This makes future blade changes easier.
Quick Tip: If your mower uses a blade adapter with a retaining pin or clip, make sure it is properly seated before tightening the nut. Missing this small part can cause the blade to fly off during operation.
Step 5: Reassemble and Test
If you removed the mower deck, now is the time to put it back on. Reattach all bolts, belts, and linkage rods. Double-check that everything is secure. Lower the mower back to the ground. Reconnect the spark plug wire. Start the engine and let it run for a minute. Listen for any unusual rattling or vibration. A smooth, quiet run means the blade is installed correctly. If you hear something off, shut off the engine immediately and check your work.
For the final test, mow a small patch of grass. Look for clean, even cuts. If the grass looks smooth and freshly cut, you have done the job right. If not, check the blade for damage or improper installation.
How to Choose the Right Replacement Blade
Understanding Blade Types
Not all mower blades are the same. Different blades serve different purposes, and choosing the right one matters for your lawn care results. Here are the most common types:
- Standard cutting blades – These are the most common. They have a flat, straight design and work well for general mowing on level lawns.
- Mulching blades – These blades have extra curves and cutting surfaces. They chop grass clippings into tiny pieces and disperse them back into the soil as natural fertilizer.
- Lifting blades – These blades have a more aggressive angle that lifts the grass before cutting. They work best on taller, thicker grass types.
- Heavy-duty blades – Thicker and more durable, these are designed for tough conditions like overgrown fields or rocky terrain.
Matching Blade Size to Your Mower
Getting the right mower blade size is critical. A blade that is too small will not reach the edges of the cutting deck. A blade that is too large can hit the deck or other components. Check your owner manual for the exact blade dimensions. You can also measure the old blade yourself from tip to tip, excluding the center hole. Most standard residential mowers use blades between 21 and 22 inches, but sizes vary widely across models.
| Blade Type | Best For | Cut Style | Average Lifespan |
|---|---|---|---|
| Standard Cutting | General mowing, flat lawns | Clean, straight cut | 1 to 2 seasons |
| Mulching | Natural fertilization | Fine mulch dispersal | 1 to 2 seasons |
| Lifting | Tall or thick grass | Aggressive lift and cut | 1 to 2 seasons |
| Heavy-Duty | Rough terrain, overgrown areas | Rough cut | 2 to 3 seasons |
Common Mistakes to Avoid When Replacing a Lawn Mower Blade
Skipping Safety Precautions
The most common mistake people make is forgetting to disconnect the spark plug. A mower can start unexpectedly if the wire is still connected. Always remove the spark plug wire first. No exceptions. Another safety mistake is working on an unstable mower. Never rely on your hands alone to hold the mower in place. Use jack stands or ramps for riding mowers, and always work on a flat surface.
Installing the Blade the Wrong Way
Direction matters more than most people realize. The cutting edge must face the ground. If you install the blade upside down, it will not cut properly and can damage your mower. Look for the word “bottom” or an arrow on the blade that points toward the ground. The mower blade center hole and adapter must also align correctly. A misaligned blade causes uneven cutting and excess vibration.
Forgetting to Balance the Blade
An unbalanced blade causes more problems than a dull one. After installing the new blade, give it a quick balance check. Place the blade on a narrow dowel or screwdriver at its center hole. If one side drops, that side is heavier. You can fix this by carefully filing down the heavier side. A balanced blade cuts cleaner and lasts longer. It also reduces wear on the engine and bearings.
Not Cleaning the Mower Deck
When you have the blade off, take a moment to clean the underside of the mower deck. Grass clippings build up over time and trap moisture. This leads to rust and corrosion. Use a wire brush or putty knife to scrape off the buildup. A clean deck allows the blade to spin freely and cuts more efficiently. This is one of the best lawn care tips that homeowners often overlook.
Maintaining Your New Blade for Longevity
How Often to Sharpen and Replace
Replacing the blade is not the end of the story. To get the most out of your investment, you need to maintain it. Sharpen the blade every 20 to 25 hours of mowing. You can use a bench grinder, a file, or a blade sharpener tool. Keep the original cutting angle when sharpening. After sharpening, always check the balance again. A sharp but unbalanced blade does more harm than a slightly dull but balanced one.
Replace the blade at least once per mowing season, or sooner if you hit rocks, tree roots, or other hard objects. A blade that has been through a serious impact may have hairline cracks that are not visible to the naked eye. When in doubt, replace it. A new blade costs much less than a damaged engine.
Storage Tips for Off-Season
When the mowing season ends, store your blade properly. Clean it thoroughly and apply a light coat of oil to prevent rust. Wrap it in a cloth or place it in a blade guard. Store it in a dry location away from moisture and humidity. If you leave the blade on the mower over winter, the moisture in the air can cause corrosion. Taking a few extra minutes to store the blade correctly adds life to both the blade and the mower.
Expert Insight: According to most lawn mower manufacturers, a well-maintained blade should last between 100 and 200 hours of use. That translates to roughly one to two seasons for the average homeowner. Regular sharpening and proper storage are the keys to reaching the upper end of that range.
When to Call a Professional for Lawn Mower Repair
Most homeowners can handle a lawn mower blade replacement without any help. However, some situations call for a professional. If your mower deck is badly rusted or damaged, a pro can assess whether it needs repair or replacement. If the engine is losing power even after a blade change, there may be a deeper issue with the carburetor, spark plug, or air filter. If you are uncomfortable working with sharp blades or heavy equipment, there is no shame in calling a local lawn mower repair shop. A trained technician can handle the job quickly and safely.
Final Thoughts
Learning how to replace lawn mower blade is one of the most valuable skills you can develop as a homeowner. It saves money, keeps your lawn healthy, and gives you more control over your outdoor space. The process is simpler than most people think. With the right tools, the correct blade, and a focus on safety, you can complete the job in under 30 minutes.
Make this a regular part of your lawn mower maintenance routine. Check your blade at the start of each season, sharpen it throughout the summer, and replace it when it shows signs of wear. Your lawn will reward you with a thicker, greener, healthier appearance. A sharp blade is the foundation of a beautiful yard, and now you have everything you need to keep yours in top shape.
Take action today. Pull out that old blade, grab a new one, and feel the difference on your next mow. Your lawn is ready for it.
Frequently Asked Questions
How often should I replace my lawn mower blade?
Most homeowners should replace their blade once per mowing season, or after about 100 to 200 hours of use. If you mow frequently or have a large lawn, you may need to replace it more often. Regular inspection helps you catch wear early.
Can I sharpen my blade instead of replacing it?
Yes, sharpening is a great option if the blade is not cracked or bent. You can sharpen with a file, bench grinder, or rotary tool. However, if the blade is damaged or has been through a hard impact, replacement is the safer choice.
Which direction does the lawn mower blade face?
The cutting edge of the blade faces the ground. The side with the manufacturer’s label or writing typically faces up toward the engine. Always check the markings on your specific blade for the correct orientation.
Do I need to remove the mower deck to replace the blade?
It depends on your mower model. Some mowers allow you to access the blade from the side without removing the deck. Others require full deck removal. Check your owner manual for the specific instructions for your model.
What size blade do I need for my mower?
Blade size varies by mower model. Check your owner manual for the exact dimensions. You can also measure the old blade from tip to tip, excluding the center hole. Common residential sizes range from 21 to 22 inches, but commercial and specialty mowers may differ.
Is it safe to change a lawn mower blade by myself?
Yes, it is safe as long as you follow proper safety steps. Always disconnect the spark plug first. Wear thick gloves and safety glasses. Work on a flat surface and secure the mower properly. If you are unsure about any step, consult a professional or your owner manual.
=== FAQS ===