

Hi friends!
If you’ve ever craved sushi but didn’t want to spend lots of money or time rolling tiny pieces… this recipe is for YOU! 🙌
Let me introduce you to the Sushi Sandwich – it’s tasty, high in protein, and a great way to use up that lonely can of tuna in your cupboard. Plus, it’s super fun to make and eat!
Let’s roll (literally 😄)!
👩🍳 Method (In Detail)
Mix the Filling
To start, grab a small bowl and open your can of tuna. Make sure to drain the brine completely so your filling doesn’t turn out watery. Add the tuna to the bowl along with 2 tablespoons of mayonnaise, 1 tablespoon of sweet chili sauce, and 2 tablespoons of Sriracha. These ingredients create a creamy, spicy, and slightly sweet mixture that packs a flavorful punch. Use a fork or spoon to mix everything together really well, breaking up any large chunks of tuna so that the mixture is nice and smooth. Set it aside while you prepare the rice.
Season the Rice (Optional but Delicious!)
If you want your sushi sandwich to taste more like classic sushi, you can add some seasoning to your rice. This step is optional but highly recommended if you have the ingredients. In a separate bowl, place your 30–40g of cold leftover rice (room-temperature or warm rice won’t work well). Add 1 teaspoon of soy sauce, 1 teaspoon of white rice vinegar, and 1 teaspoon of sesame oil. Gently stir to combine, making sure the rice absorbs the flavor but doesn’t turn mushy. This step adds depth and umami to the rice, which balances beautifully with the spicy tuna filling.
Build the Base
Lay your nori sheet on a clean, dry surface with the shiny side facing down this will help it stick together better when folding. Take your seasoned rice and place it right in the center of the nori sheet. Use your hands or the back of a spoon to gently press the rice into a square shape. Try to keep the layer of rice thin and even. The rice acts as a base to hold the filling and helps keep the sandwich firm when you fold it later.
Add the Good Stuff
Now it’s time to add the filling. Spoon a generous amount of your spicy tuna mix on top of the rice square. Don’t go too close to the edges keep it centered so it doesn’t spill out when folded. Next, place a few thin slices of avocado on top of the tuna. You can add other fresh veggies like cucumber or carrots at this step if you’d like. The creamy avocado not only adds a buttery texture but also helps balance the heat from the Sriracha.
Fold it Up
This is the fun part folding your sushi sandwich! Start by lifting one corner of the nori and folding it into the center over the filling. Then take the opposite corner and fold it over that, like you’re wrapping a present. Repeat with the remaining two corners until everything is neatly tucked in and forms a sealed, square package. If your nori isn’t sticking properly, you can dip your fingers in a bit of water and press the edges to seal them. For extra support and to keep it tightly wrapped, especially if you’re taking it on the go, wrap the entire sandwich in plastic wrap and press gently to shape it.
Slice & Enjoy!
Once your sushi sandwich is folded and secured, take a sharp knife and slice it in half. Wipe the knife between cuts if it gets sticky. When you cut it open, you’ll see the gorgeous layers of rice, spicy tuna, and avocado inside. It’s ready to eat either with your hands or chopsticks, your choice!
🧰 Necessary Tools
- 2 small bowls
- Spoon or fork for mixing
- Knife for cutting
- Plastic wrap (optional, but helps keep the sandwich together)
- Clean hands! You’ll be folding and pressing this by hand.
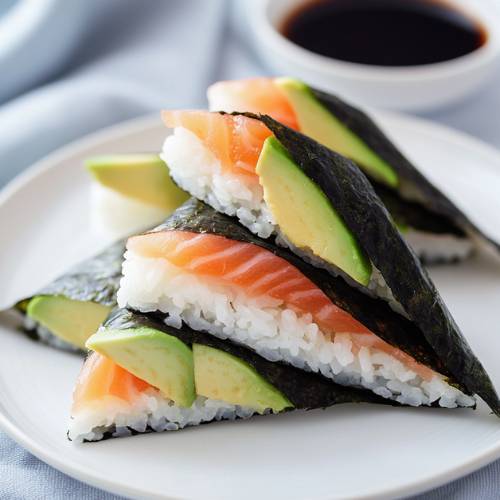
🍱 Sushi Sandwich; A Fun, Fresh Twist on Leftover Rice!
Cuisine: JapaneseDifficulty: Easy1
servings10
minutes10
minutesIngredients
1 can of tuna in brine
2 tbsp mayonnaise
1 tbsp sweet chili sauce
2 tbsp Sriracha
1 nori sheet (that’s the seaweed used for sushi!)
½ small avocado
~30–40g cold leftover rice
Optional (for sushi-style rice flavor):
1 tsp soy sauce
1 tsp white rice vinegar
1 tsp sesame oil
Directions
- Mix the Filling In a small bowl, add your tuna, mayo, sweet chili sauce, and Sriracha. Mix it all up until creamy and spicy!
- Season the Rice (optional but yum!) In another bowl, take your leftover rice and mix in soy sauce, rice vinegar, and sesame oil if you have them. It gives that classic sushi flavor. But don’t worry plain rice works too!
- Build the Base Lay your nori sheet flat, shiny side down. Add a thin layer of rice right in the center (about a square shape). Press it down gently.
- Add the Good Stuff On top of the rice, add a scoop of the tuna mix and a few slices of avocado.
- Fold it Up Fold one corner of the nori into the center, then keep folding each corner over like a little envelope until it’s all sealed. Use plastic wrap to hold it together if needed.
- Slice & Enjoy! Cut the sandwich in half and admire those yummy layers. Now dig in!
Notes
- Make sure the rice is cold before using. Warm rice will make the nori soggy and hard to fold.
- Don’t overfill the center! Too much filling can make it hard to close and might burst open.
- If your nori isn’t sticking, wet your fingers and press the edges gently it helps seal it better.
- If you’re packing it to go, wrap it tightly in cling film so it holds its shape.


🍽️ Serving Suggestions
- Eat it fresh with soy sauce or extra sweet chili sauce on the side
- Pair with miso soup or a cucumber salad for a light lunch
- Add cucumber or shredded carrots inside for crunch
- Great for lunchboxes or picnics!
🎉 Fun Fact
Did you know sushi sandwiches are also called Onigirazu in Japan? They’re super popular because they’re portable, customizable, and don’t require chopsticks!
✅ Conclusion
This Sushi Sandwich is a super easy, healthy, and fun meal idea that turns a few simple ingredients into something seriously delicious. It’s perfect for when you want sushi vibes without the fuss or just want to use up leftovers in a smart, tasty way.

