Learning what you need to paint kitchen cabinets is the first step toward a beautiful kitchen makeover. You will need the right primer, paint, brushes, sandpaper, and a little patience. This guide walks you through every tool, supply, and technique so your cabinet painting project goes smoothly. Whether you are a beginner or a seasoned DIYer, you will find practical tips to get professional results at home.
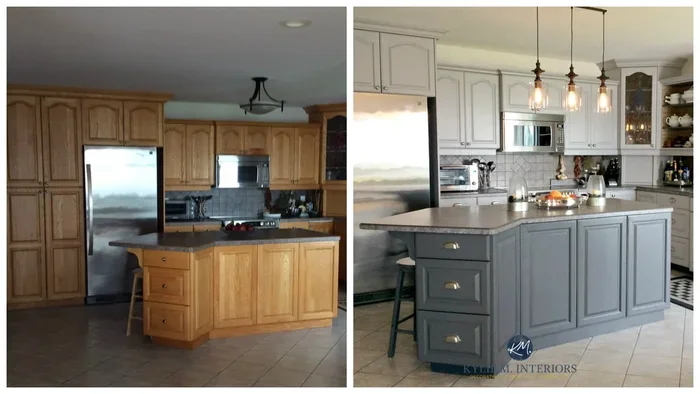
There is something truly exciting about transforming a kitchen without spending a fortune. One of the best ways to refresh your space is to paint kitchen cabinets. It is a project that delivers huge visual impact for a relatively small investment. Whether your cabinets are outdated, worn, or just boring, a fresh coat of paint can completely change the feel of your kitchen.
But here is the thing, painting cabinets is not just about grabbing a brush and going to town. You need the right supplies, the correct technique, and a bit of know-how. This guide covers everything you need to know, from the tools and materials to the step-by-step process. By the end, you will feel confident enough to tackle this kitchen upgrade yourself.
Key Takeaways
- Gather the right supplies first: primer, paint, sandpaper, brushes, rollers, and painter’s tape are essential.
- Proper prep work makes all the difference: cleaning, sanding, and taping ensure a smooth, lasting finish.
- Choose the right paint type: chalk paint, acrylic latex, and cabinet-specific paints each have unique benefits.
- Follow a step-by-step painting process: prep, prime, paint, and finish for the best outcome.
- Avoid common mistakes: skipping primer, rushing drying time, and using the wrong brush lead to poor results.
- A kitchen upgrade does not need to be expensive: painting cabinets saves thousands compared to replacement.
📑 Table of Contents
- Why Painting Kitchen Cabinets Is Worth the Effort
- Tools and Supplies You Need to Paint Kitchen Cabinets
- How to Prep Your Cabinets for Painting
- Best Paints and Finishes for Kitchen Cabinets
- Step-by-Step Cabinet Painting Process
- Tips for a Flawless Kitchen Upgrade
- Common Mistakes to Avoid When Painting Kitchen Cabinets
- Expert Insights on Cabinet Painting
- How Long Does It Take to Paint Kitchen Cabinets?
- Cost Breakdown for a Cabinet Painting Project
- Final Thoughts
Why Painting Kitchen Cabinets Is Worth the Effort
Before we dive into supplies, let us talk about why this project is so popular. Repainting kitchen cabinets is one of the highest-impact, lowest-cost home improvements you can do. New cabinets can cost thousands of dollars, but a fresh paint job can transform your kitchen for a fraction of that price.
A Kitchen Makeover on a Budget
Kitchens are the heart of the home, and they take a lot of wear and tear. Over time, cabinets can look dull, scratched, or dated. Instead of replacing them, painting gives you a brand-new look. Think of it as a cabinet refacing option that costs a tiny portion of the price. You get the same visual impact without the massive expense.
Boost Your Home Value
Updated kitchens sell homes faster. Buyers love a move-in-ready kitchen with fresh, clean lines. Even if you are not planning to sell, a kitchen makeover through cabinet painting can make your daily cooking experience more enjoyable. It is a win-win situation.
Total Creative Control
When you paint your own cabinets, you choose the color, finish, and style. Want a sleek matte white? Go for it. Prefer a bold navy or a soft sage green? You are in charge. This level of customization is hard to find with pre-made cabinet options.
Tools and Supplies You Need to Paint Kitchen Cabinets
Now let us get into the heart of the matter. Knowing what you need to paint kitchen cabinets will save you time, money, and frustration. Here is a complete list of everything you should gather before you start.
Essential Painting Supplies
- Cabinet paint: Choose a high-quality acrylic latex or cabinet-specific paint. Chalk paint is also popular for its easy application and matte finish.
- Primer for cabinets: A bonding primer is crucial. It helps the paint adhere properly and prevents peeling over time.
- Paint brushes: Get a mix of angled sash brushes for detailed work and flat brushes for larger surfaces.
- Foam roller: A small foam roller gives you smooth, even coverage on flat cabinet panels.
- Paint tray: A disposable paint tray makes filling and reloading your roller quick and easy.
- Sandpaper: You will need multiple grits, from coarse (120-grit) to fine (220-grit) for smoothing surfaces.
- Sanding block or sponge: This keeps your sanding even and prevents hand fatigue.
- Painter’s tape: High-quality tape protects edges, hinges, and handles from paint drips.
- Drop cloths: Protect your countertops and floor from paint spills and splatter.
- Tack cloth or damp rag: Use this to wipe away dust after sanding.
Surface Preparation Tools
- Deglosser or liquid sander: This chemical solution removes the glossy finish from existing cabinets so paint can grip the surface.
- Mineral spirits: Great for cleaning greasy kitchen surfaces before painting.
- Putty knife and wood filler: Fill in any dents, scratches, or holes in your cabinet doors.
- Microfiber cloths: For final wiping before and after priming.
Hardware and Removal Tools
- Screwdriver or drill: You will need this to remove cabinet doors, drawers, and hardware.
- Small containers or bags: Label and store screws and hinges so you do not lose them.
- Masking paper: For covering large areas you do not want painted.
- Cabinet pulls and hinges: Consider upgrading your cabinet hardware while you are at it for a fresh look.
Optional but Helpful Extras
- Paint sprayer: If you want ultra-smooth coverage fast, a small HVLP sprayer is a game-changer for spray painting cabinets.
- Paint conditioner: This slows drying time and reduces brush marks, especially with chalk paint.
- Level: To ensure your cabinet doors hang straight after reinstallation.
- Pencil and measuring tape: For marking and aligning doors during reassembly.
How to Prep Your Cabinets for Painting
Preparation is the most important step in any cabinet painting project. Skipping prep is the number one reason paint jobs fail. Take your time with this phase, and the results will speak for themselves.
Remove Cabinet Doors and Hardware
Start by taking off all cabinet doors, drawers, and hardware. Use your screwdriver or drill to carefully remove each piece. Place screws and small parts into labeled bags or containers. This keeps everything organized and prevents lost hardware during the painting process. Number each door and its corresponding location so reassembly is a breeze.
Clean the Surfaces Thoroughly
Kitchen cabinets accumulate grease, grime, and cooking residue over the years. Use a solution of warm water and degreaser, or wipe down with mineral spirits to cut through the buildup. Pay special attention to the areas around handles and hinges where grease tends to collect. Let the surfaces dry completely before moving to the next step.
Sand and Degloss
Most cabinets have a smooth, glossy finish that paint will not stick to. You need to break that surface. Use your deglosser or liquid sander according to the product instructions. Then, follow up with 120-grit sandpaper to lightly scuff the entire surface. Finish with 220-grit sandpaper for a smooth feel. Wipe away all dust with a tack cloth or damp microfiber rag.
Fill and Repair
Inspect each cabinet door and drawer front for dents, scratches, or holes. Apply wood filler with a putty knife, let it dry completely, and sand it smooth with fine-grit sandpaper. This step ensures a flawless surface when you start painting.
Mask and Protect
Apply painter’s tape to any areas you do not want painted, such as the inside edges of cabinet boxes. Lay down drop cloths over your countertops and floor. This might seem tedious, but it saves you a lot of cleanup time later.
Best Paints and Finishes for Kitchen Cabinets
Choosing the right cabinet paint is critical for a durable, beautiful finish. Not all paints are created equal, and using the wrong type can lead to peeling, chipping, or an uneven look.
Acrylic Latex Paint
Acrylic latex paint is the most popular choice for painting cabinets. It is durable, easy to clean, and dries to a smooth finish. It also has low odor and cleans up with soap and water. Look for a satin or semi-gloss finish, which holds up well in kitchens where moisture and splashes are common.
Chalk Paint
Chalk paint has become a favorite among DIYers for its matte, velvety look. It applies easily with a brush and does not require extensive sanding. However, chalk paint is more prone to chipping, so many people seal it with a wax or polyurethane topcoat for added protection.
Cabinet-Specific Paint
Some brands offer paint formulated specifically for cabinets and trim. These products are designed to be extremely durable and self-leveling, which minimizes brush strokes. They often come in a wide range of colors and finishes, making them a premium option for cabinet painting projects.
Spray Paint for Cabinets
If you want the smoothest possible finish, consider spray painting cabinets. A small HVLP sprayer gives you professional-grade results with minimal effort. The downside is that it requires more setup, ventilation, and practice. It also uses more paint than brushing or rolling.
| Paint Type | Durability | Ease of Use | Finish Options | Best For |
|---|---|---|---|---|
| Acrylic Latex | High | Easy | Satin, Semi-Gloss | Most kitchen cabinets |
| Chalk Paint | Medium | Very Easy | Matte | Rustic or farmhouse styles |
| Cabinet-Specific | Very High | Easy | Multiple | Professional-quality results |
| Spray Paint | High | Moderate | Satin, Semi-Gloss | Smooth, even finish |
Choosing the Right Finish
The finish you choose affects both the look and the durability of your kitchen upgrade. Satin and semi-gloss finishes are the most practical for kitchens because they resist moisture and wipe clean easily. Matte finishes look elegant but are harder to clean. For most homeowners, a satin finish hits the perfect balance between beauty and function.
Step-by-Step Cabinet Painting Process
Now that your cabinets are prepped and your supplies are ready, it is time to paint. Follow these steps carefully for the best results.
Step One: Apply Primer
Start by applying a coat of primer for cabinets to all surfaces. Use a quality brush for edges and details, and a foam roller for flat panels. Primer creates a bonding layer that helps the paint adhere and look its best. Let the primer dry completely according to the manufacturer’s instructions, usually two to four hours.
Step Two: Lightly Sand Between Coats
Once the primer is dry, lightly sand the entire surface with 220-grit sandpaper. This creates a slightly textured surface that helps the topcoat grip. Wipe away dust with a tack cloth before moving to the next step.
Step Three: Apply the First Paint Coat
Using a quality brush or foam roller, apply the first coat of your chosen cabinet paint. Work in thin, even strokes to avoid drips and brush marks. Start with the edges and details, then fill in the larger flat areas. Allow each coat to dry fully before adding the next.
Step Four: Apply the Second and Third Coats
Most cabinet projects require two to three coats of paint for full, even coverage. Apply each coat the same way, sanding lightly between coats. The more coats you apply, the richer and more durable the finish will be. Do not rush this process, as thick coats can drip and take longer to dry.
Step Five: Apply a Protective Topcoat
For extra durability, apply a clear protective topcoat after the final paint coat. This is especially important in kitchens where cabinets face moisture, heat, and daily use. A water-based polyurethane or cabinet-specific topcoat adds a layer of protection without changing the color.
Step Six: Reassemble Your Cabinets
Once everything is completely dry, carefully reattach your cabinet doors, drawers, and hardware. Use your labels and numbered bags to make this process smooth. Check that each door hangs evenly and opens and closes properly. Adjust hinges as needed for a perfect fit.
Tips for a Flawless Kitchen Upgrade
A few extra tips can take your cabinet painting project from good to outstanding. Keep these insights in mind as you work.
Work in a Well-Ventilated Area
If you are painting indoors, open windows and use a fan to keep air circulating. Proper ventilation helps paint dry faster and reduces fumes. If possible, remove cabinet doors and paint them outside or in a garage.
Use a Paint Conditioner
Especially if you are using chalk paint, a paint conditioner helps the paint flow smoothly and reduces brush marks. It extends your working time so you can blend and smooth out strokes before they dry.
Paint in the Right Order
Always paint the inside of cabinet boxes first, then the doors and drawers. This way, any drips or overspray on the boxes will be covered by the doors when you reassemble. Paint the backs of cabinet doors first, then the fronts.
Upgrade Your Cabinet Hardware
While you have your cabinets off, consider replacing old cabinet pulls and hinges with fresh new ones. New hardware is a small investment that makes a big difference in the overall look. It is one of the easiest ways to elevate your kitchen makeover.
Be Patient with Drying Times
It can be tempting to rush the drying process, but patience pays off. Allow each coat to dry fully before applying the next. Most quality paints need at least 24 hours between coats and 48 to 72 hours to fully cure before you reassemble your cabinets.
Common Mistakes to Avoid When Painting Kitchen Cabinets
Even experienced DIYers make mistakes. Knowing what to avoid will save you headaches and help you achieve a professional-quality finish.
- Skipping primer: This is the most common mistake. Without primer, your paint will not adhere properly and may peel within weeks.
- Not sanding enough: A glossy surface resists paint. Always degloss and sand before priming for the best bond.
- Using too thick a coat: Thick coats drip, sag, and take forever to dry. Thin, even coats build up better coverage over time.
- Rushing between coats: Applying paint before the previous coat is fully dry leads to bubbling and uneven texture.
- Forgetting to clean after sanding: Dust left on the surface creates a rough, bumpy finish. Always wipe down with a tack cloth.
- Using low-quality paint: Cheap paint requires more coats, looks less professional, and wears out faster. Invest in a good-quality cabinet paint for lasting results.
- Reassembling too soon: Paint needs time to fully cure. Reattaching doors too early can cause dents, sticking, or smudges.
Expert Insights on Cabinet Painting
Professional painters and experienced DIYers share a few insights that can make your cabinet painting project much smoother.
Invest in quality brushes. A good angled sash brush makes a noticeable difference in how smooth your edges look. Cheap brushes leave bristle marks and uneven coverage that you will have to fix later.
Consider a paint sprayer for large projects. If you have a full kitchen of cabinets, a sprayer can cut your painting time in half. Just be sure to practice on scrap wood first to get comfortable with the technique.
Do not underestimate the power of color. White is the most popular choice, but soft grays, blues, and greens are trending in kitchen design. Choose a color that complements your countertops, backsplash, and flooring for a cohesive look.
Seal chalk paint if you want durability. Chalk paint looks beautiful but is not naturally durable in a high-moisture kitchen. Applying a clear wax or polyurethane sealer protects the finish and makes it easier to clean.
How Long Does It Take to Paint Kitchen Cabinets?
The timeline depends on the size of your kitchen and your experience level. For a small to medium kitchen, plan for about two to three days. The first day is for prep and priming, the second day for painting, and the third day for drying and reassembly. If you are using a sprayer, you might finish faster. If you are painting by hand with a brush and roller, give yourself extra time for careful, detailed work.
Cost Breakdown for a Cabinet Painting Project
One of the biggest advantages of painting kitchen cabinets is the affordability. Here is a rough cost breakdown for a typical kitchen.
- Primer: $20 to $40
- Cabinet paint (2-3 quarts): $40 to $80
- Sandpaper and supplies: $15 to $25
- Brushes, rollers, and tray: $15 to $30
- Painter’s tape and drop cloths: $10 to $20
- New hardware (optional): $30 to $100
All in, you can expect to spend between $130 and $295 on materials. Compare that to the cost of new cabinets, which can easily run $5,000 or more. The savings are significant, and the results can look just as stunning.
Final Thoughts
Painting kitchen cabinets is one of the most rewarding DIY projects you can take on. It transforms your space, adds value to your home, and costs a fraction of cabinet replacement. With the right supplies, proper preparation, and a patient approach, you can achieve results that look professionally done.
Remember, the key to success is in the prep. Clean, sand, prime, and paint in thin, even coats. Take your time with each step, and do not rush the drying process. Whether you choose a classic white, a trendy gray, or a bold statement color, your freshly painted cabinets will breathe new life into your kitchen.
Now that you know exactly what you need to paint kitchen cabinets, it is time to gather your supplies and get started. Your dream kitchen is just a few weekends away. Roll up your sleeves, put on some music, and enjoy the process of creating something beautiful with your own hands.
Frequently Asked Questions
Can I paint kitchen cabinets without sanding them?
You can, but it is not recommended. Sanding creates a rough surface that helps paint adhere properly. If you skip sanding, use a liquid deglosser to break down the glossy finish. Even with a deglosser, light sanding gives you the best long-lasting results for your cabinet painting project.
How many coats of paint do kitchen cabinets need?
Most cabinets need two to three coats of paint for full, even coverage. The exact number depends on the color you are covering, the type of paint you use, and how well you prepped the surface. Always let each coat dry completely before applying the next one.
Is chalk paint or acrylic latex better for kitchen cabinets?
Acrylic latex is generally more durable and easier to clean, making it the better choice for high-use kitchens. Chalk paint gives a beautiful matte finish but requires sealing for protection. Choose based on your style preference and how much wear your cabinets endure daily.
Do I need to remove cabinet doors to paint them?
Yes, removing doors and drawers gives you the best results. It allows you to paint all surfaces evenly and reach tight spots. If you cannot remove them, use painter’s tape to protect surrounding areas and paint carefully with a brush. But for a professional finish, removal is the way to go.
How long should I wait before reassembling painted cabinets?
Wait at least 48 to 72 hours after the final coat before reassembling. Paint needs time to fully cure, not just dry. Reassembling too early can cause dents, smudges, or sticking doors. Check the paint can label for specific curing time recommendations.
Can I paint over existing cabinet paint?
Yes, you can paint over existing paint as long as the current finish is in good condition. Clean the surfaces, lightly sand to create adhesion, and apply a bonding primer before painting. If the existing paint is peeling or flaking, remove it first and then follow the full prep process.
=== CONCLUSION ===
Painting kitchen cabinets is a fantastic way to refresh your space without the huge expense of new cabinetry. From gathering the right tools and supplies to following a careful prep-and-paint process, this guide has covered everything you need to know. The key is patience, preparation, and using quality materials that will stand up to daily kitchen life.
Take the time to sand, prime, and apply multiple thin coats, and your cabinets will look stunning for years to come. Whether you are chasing a kitchen makeover or simply want a fresh update, painting your cabinets is a project that delivers real results. Gather your supplies, clear your schedule, and start transforming your kitchen today.