

Hey cookie lovers!
It’s that magical time of the year again Christmas! And you know what that means? Time to bring out the sugar, butter, and all the fun stuff we usually save just for the holidays. Today, I’m sharing one of my favorite Christmas cookie recipes that’s super simple and totally adorable. Whether you want to snack on them, gift them, or leave some out for Santa, these cookies are always a hit!
Method (In Detail)
Creaming the Butter and Sugar:
First things first, I grabbed a large mixing bowl and added the softened butter and sugar. Using a wooden spoon or hand mixer, I creamed them together until the mixture became smooth, fluffy, and pale. This step is really important because it helps create that light texture we all love in cookies. Make sure your butter is soft (but not melted!) so it blends nicely with the sugar.
Mixing in Wet Ingredients:
Once the butter and sugar were well creamed, I cracked in one egg and added a few drops of vanilla extract. Then I mixed everything again until the egg was fully incorporated and the mixture looked smooth and slightly glossy. The vanilla adds a warm, sweet aroma that makes the dough smell like Christmas already!
Adding the Dry Ingredients:
Next, it was time to add the dry ingredients. I carefully measured and added the flour, baking powder, and salt. Then, I stirred it all together until it formed a soft dough. Be gentle during this step mix just enough to bring the dough together. Over-mixing can make the cookies tough, and we definitely want them soft and tender!
Rolling Out the Dough:
After forming the dough, I lightly dusted my work surface with flour and placed the dough on it. Using a rolling pin, I gently rolled the dough out to about 1/4 inch thickness. Try to keep it even so that all your cookies bake at the same rate. This is where the holiday magic starts to come alive!
Cutting Out the Shapes:
With the dough rolled out, I picked my favorite cookie cutters stars this time, because once decorated, they look just like snowflakes! You can also use Christmas trees, gingerbread people, bells, or any festive shapes you like. I pressed the cutters into the dough and lifted out each shape carefully.
Preparing for Baking:
I lined a baking tray with parchment paper and gently transferred the cookie shapes onto it. Make sure to leave a bit of space between each cookie because they’ll spread just a little while baking. If the dough gets too soft while cutting, you can pop it into the fridge for a few minutes to firm it up.
Baking the Cookies:
I preheated the oven to 180°C (350°F) and baked the cookies for around 10 minutes. You’ll know they’re ready when the edges are just starting to turn a light golden brown. Be careful not to overbake they can go from perfect to too crispy really fast!
Cooling Time:
Once out of the oven, I let the cookies sit on the tray for a minute or two, then transferred them to a cooling rack. It’s important to let them cool completely before decorating otherwise, the icing can melt and slide right off.
Decorating the Cookies:
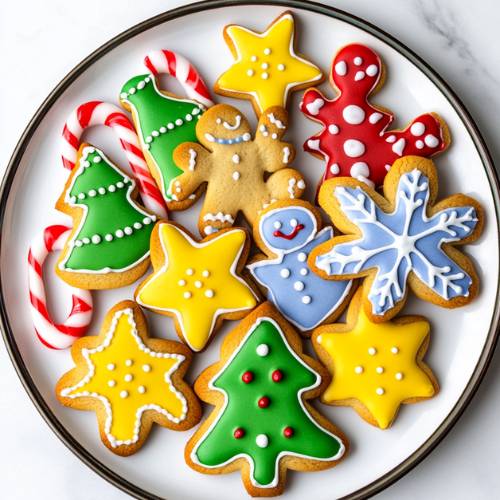
Now for the fun part decorating! I used white writing icing to turn my star-shaped cookies into beautiful snowflakes. You can get creative here and use colored icing, sprinkles, or even edible glitter. Let the decorated cookies sit for a while to allow the icing to set before packing or serving.
Necessary Tools:
- Mixing bowl
- Wooden spoon or hand mixer
- Rolling pin
- Cookie cutters (stars, trees, or whatever Christmassy shapes you like!)
- Baking tray
- Parchment paper
- Oven
- Cooling rack

Easy Christmas Cookies (Soft, Festive & Ready in 25 Minutes)
Cuisine: EuropianDifficulty: Easy12
servings15
minutes10
minutes25
minutesIngredients
80g butter (softened)
70g sugar
1 egg
130g flour
1/4 tsp baking powder
1/4 tsp salt
A few drops of vanilla extract
Icing sugar or writing icing for decoration
Directions
- First, I mixed the softened butter and sugar until smooth and creamy.
- Then, I added the egg and vanilla extract and mixed again until everything was well combined.
- After that, I added flour, baking powder, and salt. I mixed until it became a soft, even dough.
- placed the dough on a floured surface and rolled it out using a rolling pin.
- Now the fun part cutting out Christmassy shapes! I used star cutters (they look like snowflakes after decorating).
- placed the shapes on a baking tray lined with parchment paper.
- Then, I baked them at 180°C (350°F) for about 10 minutes or until they turned slightly golden.
- After baking, I let them cool on a rack.
- Once cool, I decorated them with white icing. You can use any colors or toppings you love!
Notes
- Make sure your butter is softened but not melted this helps the dough stay firm.
- Don’t over-mix the dough or the cookies may turn out too hard.
- Keep an eye on the oven! These cookies bake quickly and can go from perfect to too brown in seconds.
- Let the cookies cool completely before decorating or the icing will melt right off.




Serving Suggestions:
These cookies are perfect with a cup of hot chocolate, warm milk, or even eggnog! You can pack them in a festive box and give them as sweet little gifts. They also look amazing served on a holiday dessert table with some fairy lights around!
Fun Fact:
Did you know that decorating cookies is a holiday tradition that dates back hundreds of years? In Germany, people started baking “Yule” cookies and used them to decorate Christmas trees!
Conclusion:
And there you have it my super fun, easy, and festive Christmas cookie recipe! These cookies are such a joy to make and even more fun to eat. I love giving them to friends and family with a handmade card. It’s a small treat that brings big smiles.
Wishing you all a sweet, cozy, and magical Christmas!