Adding a pantry to your kitchen is one of the best ways to boost storage and keep your home organized. Whether you have a large open space or a tiny apartment, a pantry addition can transform how you store food, cookware, and household essentials. This guide walks you through every step, from planning and design to installation and organization.
Key Takeaways
- Plan your layout first: Measure your space and choose the right pantry type before buying materials.
- Choose from several styles: Walk-in, reach-in, and corner pantries each offer unique benefits for different kitchen sizes.
- Organization is key: Use shelves, bins, and labels to make the most of your new pantry space.
- DIY is doable: Many homeowners can build a pantry themselves with basic tools and a weekend of time.
- Think about food storage: A well-designed pantry works great for dry goods, jars, and even snacks like those stored in a Greek Salad In A Jar setup.
📑 Table of Contents
- Why Every Kitchen Needs a Pantry
- Step 1: Assess Your Kitchen Space
- Step 2: Choose the Right Pantry Type
- Step 3: Design Your Pantry Layout
- Step 4: Build or Install Your Pantry
- Step 5: Organize and Maintain Your Pantry
- Common Pantry Mistakes to Avoid
- Expert Tips for Maximizing Pantry Space
- The Cost of Adding a Pantry
- Conclusion
Why Every Kitchen Needs a Pantry
A pantry is more than just a closet. It is the heart of a well-organized kitchen. When you have a dedicated space for food and supplies, everything becomes easier. You stop scrambling for ingredients. You stop buying duplicates. You stop feeling like your kitchen is always cluttered.
Adding a pantry to a kitchen solves one of the most common home storage problems. Many homes today come with tiny or no pantries at all. Homeowners end up using counters, cabinets, and random corners to store food. This creates mess and stress. A proper pantry fixes all of that.
The good news is that you do not need a huge kitchen to make it work. Even small spaces can accommodate a pantry addition with smart planning. Let us walk through exactly how to do it.
Step 1: Assess Your Kitchen Space
Before you buy a single board or shelf, you need to understand what you are working with. Walk through your kitchen and look for potential pantry spots. Some kitchens have a small alcove that could become a pantry. Others have an empty wall that could hold a reach-in pantry.
Measure Everything
Grab a tape measure and write down the dimensions. You need to know the width, depth, and height of your chosen space. A pantry should be at least 12 inches deep to be useful. Anything shallower and you will struggle to fit items inside.
Here are common pantry sizes to consider:
- Small pantry: 24 inches wide by 12 inches deep
- Medium pantry: 36 inches wide by 16 inches deep
- Large walk-in pantry: 48 inches wide by 24 inches deep or more
Write down what you currently store in your kitchen. Count the number of dry goods, canned items, snacks, and small appliances. This list will help you decide how big your pantry needs to be.
Check for Existing Structures
Look for any existing cabinets, columns, or architectural features that could be repurposed. Sometimes a hallway closet or a dead space between walls can become a functional pantry with minimal construction. This saves money and keeps your kitchen renovation simple.
Step 2: Choose the Right Pantry Type
Not all pantries are the same. The right type depends on your kitchen size, budget, and storage needs. Let us break down the most popular options.
Walk-In Pantry
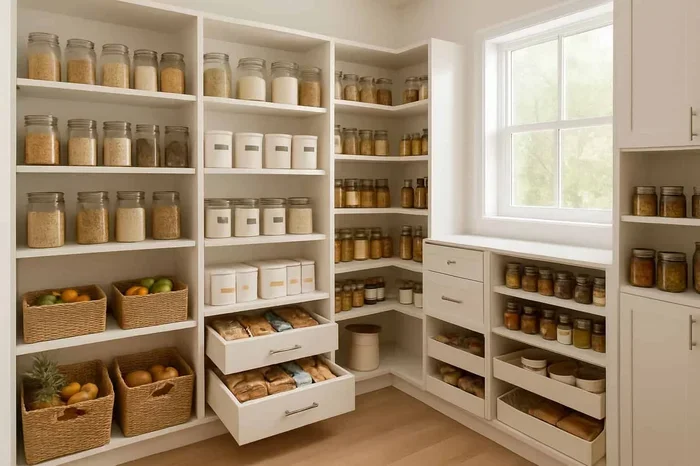
A walk-in pantry is the dream of every home organizer. It is a small room or enclosed area that you can step into. Walk-in pantries offer the most space and the best organization options. You can install pantry shelves, hooks, and even a small countertop inside.
These work best in larger kitchens or open-concept floor plans. If your home has a dining room or hallway near the kitchen, you might be able to convert part of it into a walk-in pantry.
Reach-In Pantry
A reach-in pantry is a cabinet-style storage unit that you access from one side. It fits into a standard kitchen layout and does not require much floor space. You can build one into a wall cavity or use it as a standalone unit.
Many homeowners love reach-in pantries because they fit easily into existing kitchen layouts. They are perfect for apartments and smaller homes where every square foot matters.
Corner Pantry
Corner pantries use the often-wasted space in the corner of a room. They are a clever solution for kitchens with awkward corners that are hard to furnish. A corner pantry can hold a surprising amount of food and supplies.
You can build a corner pantry with angled shelves or use a lazy Susan-style rotating system. This makes it easy to access items stored in the back.
Step 3: Design Your Pantry Layout
Now comes the fun part. Designing the inside of your pantry is where the real organization magic happens. A good layout makes it easy to find what you need and keeps everything visible.
Shelving Options
Shelving is the backbone of any pantry. You have several options to choose from:
- Fixed shelves: These are built into the walls and offer a permanent solution. They are sturdy and can hold heavy items like canned goods.
- Adjustable shelves: These let you change the height as your storage needs change. They are great for flexibility.
- Pull-out shelves: These slide out like drawers, making it easy to reach items at the back. They are a game-changer for kitchen storage solutions.
- Wire shelves: These allow air to circulate, which helps keep dry goods fresh. They are also easy to clean.
Storage Containers and Bins
Clear storage containers are a pantry organizer’s best friend. They let you see what is inside without opening every box. Use uniform containers for a clean, tidy look. Label each container with the item name and expiration date.
For smaller items like spices and snacks, use bins or baskets. These keep loose items from getting lost on deep shelves. You can even repurpose glass jars for a rustic look that also works well for storing items like the ingredients you would use to make a Greek Salad In A Jar for meal prep.
Hooks and Racks
Do not forget the vertical space. Install hooks on the inside of your pantry door to hang measuring cups, oven mitts, or reusable bags. A small rack can hold spices right at eye level. These small additions free up shelf space and keep things within reach.
Step 4: Build or Install Your Pantry
With a plan in hand, it is time to start building. You can either build a pantry from scratch or install a pre-made pantry system. Both approaches have their advantages.
DIY Pantry Build
Building your own pantry is a rewarding weekend project. Here is a simple step-by-step process:
- Frame the walls: Use 2×4 lumber to build a basic frame. Make sure it is level and plumb.
- Install the back panel: Attach plywood or drywall to the back of the frame.
- Add shelves: Secure your shelves at the desired heights. Use a level to make sure they are even.
- Finish the front: Add a door or curtain. You can use a simple curtain rod for a budget-friendly option.
- Paint and organize: Paint the interior to match your kitchen. Then fill it up!
You do not need advanced carpentry skills for this project. Basic tools like a drill, level, and saw are all you need. If you prefer a more finished look, consider adding pantry doors that match your kitchen cabinets.
Pre-Made Pantry Systems
If building from scratch feels overwhelming, pre-made pantry systems are a great alternative. Many home improvement stores sell ready-to-assemble pantry organizers. These include cabinets, shelving units, and organizational accessories.
Some popular brands offer customizable systems that fit almost any space. Look for options with adjustable shelves and sturdy construction. A pre-made system can save you hours of work and still give you a professional-looking result.
Hiring a Professional
For a truly custom pantry, consider hiring a contractor or kitchen designer. They can create a built-in pantry that fits your space perfectly. This is especially worthwhile if you are planning a larger kitchen renovation anyway. A professional can also handle electrical work if you want to add lighting inside your pantry.
Step 5: Organize and Maintain Your Pantry
Building the pantry is only half the battle. Keeping it organized is what makes it truly useful. A messy pantry defeats the purpose of having one in the first place.
Group Items by Category
Organize your pantry by food category. Here is a simple system that works well:
- Top shelves: Items you use rarely or that are lightweight (extra paper goods, seasonal items)
- Eye-level shelves: Items you use daily (pasta, rice, cereal, snacks)
- Lower shelves: Heavy items (canned goods, oils, large containers)
- Door and corner spaces: Spices, small packets, and loose items
This system makes it easy to find what you need without digging through everything. It also helps you see when you are running low on staples.
First In, First Out
Use the FIFO method to keep your pantry fresh. Place newer items behind older ones so you always use the oldest items first. This reduces food waste and saves money over time.
Seasonal Rotation
Rotate seasonal items like holiday baking supplies or summer snacks. Store off-season items on the top or back shelves. This keeps your everyday items easily accessible and your pantry feeling clutter-free.
Some people love to prep snacks ahead of time. For example, you can make Frozen Watermelon On A Stick and store them in your pantry freezer section for a healthy, refreshing treat. Having a well-organized pantry makes this kind of meal prep simple and fun.
Common Pantry Mistakes to Avoid
Even with the best intentions, many people make mistakes when adding a pantry. Here are a few to watch out for:
- Making shelves too deep: Deep shelves cause items to get lost in the back. Keep shelves at 12 to 16 inches deep for easy access.
- Forgetting lighting: A dark pantry is frustrating. Add a simple LED light strip or battery-operated puck light inside.
- Skipping the door: An open pantry lets dust and pests in. Always add a door, even if it is a simple curtain.
- Overloading shelves: Heavy items need sturdy shelf supports. Check the weight capacity before loading up.
- Ignoring airflow: Good ventilation keeps your pantry dry and prevents mold. Leave some space between walls and stored items.
Expert Tips for Maximizing Pantry Space
Want to get the most out of your new pantry? Here are some expert-backed tips that make a big difference:
- Use tension rods: Place a tension rod vertically between shelves to create extra levels for storing items like cutting boards or baking sheets.
- Install a label maker: Labels keep everything looking neat and help every family member find items quickly.
- Add a small scale: Keep a kitchen scale inside the pantry for easy portioning and meal prep.
- Use clear bins: They keep like items together and let you see contents at a glance.
- Add a trash and recycling bin: A small bin inside the pantry keeps your kitchen counters clear of bags.
The goal of a pantry is not just storage. It is about creating a system that works for your daily life. When you can find everything quickly and easily, cooking becomes more enjoyable and less stressful.
The Cost of Adding a Pantry
Budget is always a factor in home improvement projects. The cost of adding a pantry varies widely depending on the approach you choose.
| Pantry Type | Estimated Cost | Difficulty Level |
|---|---|---|
| DIY Reach-In Pantry | $100 – $400 | Easy to Moderate |
| Pre-Made Pantry Cabinet | $300 – $1,200 | Easy |
| Custom Walk-In Pantry | $1,000 – $5,000+ | Moderate to Hard |
| Professional Installation | $2,000 – $8,000+ | Varies |
These costs include materials and basic finishes. They do not include hiring a professional for custom builds. Keep in mind that a pantry adds real value to your home. Potential buyers love kitchens with extra storage, so it is a worthwhile investment.
Conclusion
Adding a pantry to a kitchen is one of the smartest upgrades you can make. It gives you more storage, better organization, and a kitchen that actually feels functional. Whether you choose a simple reach-in cabinet or a full walk-in pantry, the benefits are clear.
Start by measuring your space and choosing the right pantry type. Plan your layout carefully, pick the right shelving and storage tools, and then build with confidence. Once your pantry is in place, keep it organized with simple systems like category grouping and the FIFO method.
A well-designed pantry changes the way you cook and live in your kitchen. It saves time, reduces stress, and makes every meal prep session smoother. So grab your tape measure, roll up your sleeves, and start building the pantry your kitchen deserves.
Frequently Asked Questions
How much does it cost to add a pantry to a kitchen?
The cost depends on the type of pantry you build. A DIY reach-in pantry can cost as little as $100 to $400 in materials. Pre-made pantry cabinets range from $300 to $1,200. Custom walk-in pantries with professional installation can run $2,000 to $8,000 or more. Your budget and kitchen size will determine the final price.
What is the best pantry size for a small kitchen?
For a small kitchen, a reach-in pantry that is 24 to 36 inches wide and at least 12 inches deep works well. You can also use a corner pantry to make the most of unused space. The key is to maximize vertical storage with adjustable shelves and pull-out organizers.
Can I add a pantry to any kitchen?
Most kitchens can accommodate some form of pantry. Even if you do not have a dedicated room or large closet, you can build a slim reach-in pantry into a wall cavity or under a staircase. The trick is to assess your available space and choose a pantry style that fits your layout.
What is the best way to organize a pantry?
The best approach is to group items by category, such as grains, canned goods, snacks, and baking supplies. Use clear containers and labels for visibility. Place everyday items at eye level and heavier items on lower shelves. A simple first-in, first-out system keeps your pantry fresh and clutter-free.
Do I need a door on my pantry?
Yes, a door helps keep dust, pests, and odors out of your stored food. You do not need an expensive door. A simple curtain, sliding barn door, or basic cabinet door works perfectly. The important thing is that your pantry has some form of enclosure.
How long does it take to build a pantry?
A simple DIY reach-in pantry can be built in one to two weekends. Pre-made pantry systems often take just a few hours to assemble. Custom walk-in pantries built by professionals may take one to three weeks depending on complexity. Planning and measuring ahead of time will save you significant time during the build.