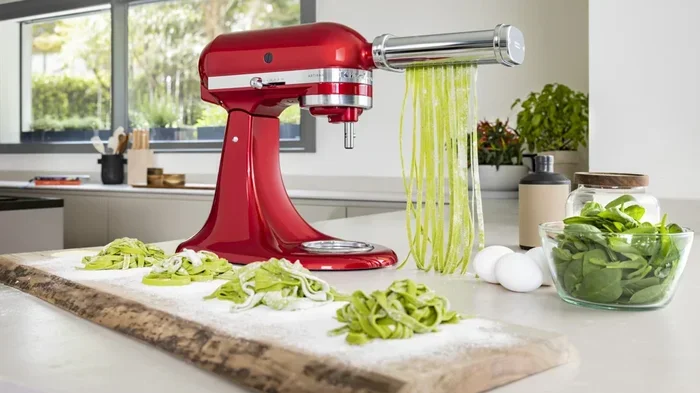
Making homemade pasta with KitchenAid is simple, fun, and incredibly rewarding. You will learn how to use your stand mixer and pasta attachment to create fresh, silky pasta dough in minutes. This guide covers everything from mixing and kneading to shaping and cooking perfect pasta every time.
There is something truly magical about homemade pasta with KitchenAid. The silky texture, the rich eggy flavor, and the satisfaction of creating it all yourself — it is a game changer in any kitchen. Whether you are a complete beginner or a seasoned home cook, using your KitchenAid stand mixer to make pasta is easier than you think.
Store-bought pasta simply cannot compare to the real thing. Fresh pasta cooks faster, tastes better, and soaks up sauce beautifully. With the right attachment and a little practice, you will be whipping up restaurant-quality fresh pasta right on your countertop. This guide walks you through every single step, from mixing the dough to cooking it to perfection.
By the end of this article, you will feel confident enough to make pasta any night of the week. We will cover the equipment you need, the dough recipe, how to shape different cuts, and even tips for storing your leftovers. Let us dive in and make some amazing homemade pasta with KitchenAid!
Key Takeaways
- KitchenAid makes pasta making easy: Your stand mixer with a pasta attachment does the heavy lifting for you.
- Fresh pasta dough needs just a few ingredients: Flour, eggs, olive oil, and salt are all you need to start.
- You can make many pasta shapes: From fettuccine to spaghetti, your KitchenAid attachment handles it all.
- Drying and storing pasta is simple: Learn how to keep your fresh pasta fresh for days or freeze it for later.
- Cooking fresh pasta is fast: Unlike dried store-bought pasta, fresh pasta cooks in just 2 to 3 minutes.
- Experiment with flavors and colors: Add spinach, beetroot, or herbs to create stunning homemade pasta with KitchenAid.
📑 Table of Contents
- Why Use KitchenAid for Making Pasta?
- What You Need to Get Started
- Step-by-Step Guide to Making Pasta with KitchenAid
- Popular Pasta Shapes You Can Make
- Tips for Perfect Homemade Pasta
- Storing and Freezing Fresh Pasta
- Creative Ways to Use Your Fresh Pasta
- Common Mistakes to Avoid
- Expert Insights on KitchenAid Pasta Making
- Conclusion
Why Use KitchenAid for Making Pasta?
You might wonder why so many people swear by using a KitchenAid stand mixer for pasta. The answer is simple — it saves time and effort. The pasta attachment does the kneading and rolling for you, which means no sore arms and no flour-covered counters.
Here are some great reasons to use your KitchenAid for pasta making:
- Consistent results every time: The mixer applies even pressure, so your dough thickness stays uniform.
- Hands-free operation: You can focus on other prep work while the mixer handles the dough.
- Multiple shapes with one attachment: Most KitchenAid pasta kits come with several dies for different cuts.
- Less mess: The attachment keeps everything contained inside the mixer bowl.
- Great for batches: You can make enough pasta for a family dinner without breaking a sweat.
If you have a KitchenAid stand mixer sitting on your counter, you already have everything you need to start. The KitchenAid pasta attachment is one of the best investments a pasta lover can make. It transforms a once-labor-intensive task into a quick and enjoyable kitchen activity.
What You Need to Get Started
Essential Equipment
Before you start, make sure you have the right tools ready. Here is a simple checklist:
- KitchenAid stand mixer: Any model with a planetary mixing action works well.
- Pasta roller and cutter attachment: This is the key piece that turns your mixer into a pasta maker.
- Large mixing bowl: Usually included with your KitchenAid.
- Clean work surface: A lightly floured countertop or cutting board works great.
- Pastry brush or clean hands: For lightly flouring the dough as you work.
- Baking sheets or drying racks: For hanging or laying out your cut pasta.
Ingredients for Basic Fresh Pasta Dough
The beauty of homemade pasta is how few ingredients it needs. Here is what goes into a basic batch:
- 2 cups all-purpose flour (or use semolina flour for a chewier texture)
- 3 large eggs (room temperature for best results)
- 1 tablespoon olive oil (optional, adds smoothness)
- ½ teaspoon salt (enhances the flavor of the dough)
That is it! With just these simple ingredients, you can create beautiful egg pasta that forms the base for countless dishes. If you want to get creative, you can swap in whole wheat flour or add pureed vegetables for color and nutrition.
Step-by-Step Guide to Making Pasta with KitchenAid
Step 1: Mix the Dough
Start by adding the flour and salt directly into the mixer bowl. Attach the flat beater to your KitchenAid. Pour the eggs and olive oil into the flour well you have created. Turn the mixer on to speed 2 and let it run for about 2 minutes. The dough should come together into a shaggy ball.
If the dough looks too dry, add a teaspoon of water. If it is too sticky, sprinkle in a little more flour. You want the dough to be smooth and slightly tacky but not sticking to your hands.
Step 2: Knead with the Dough Hook
Switch out the flat beater for the dough hook attachment. Knead the dough on speed 2 for about 4 to 5 minutes. The dough should become smooth, elastic, and slightly springy. You can also do this by hand on a floured surface, but the KitchenAid makes it so much easier.
Quick tip: Do not over-knead. The dough should feel like an earlobe — soft and pliable. Over-kneaded pasta dough can become tough and difficult to roll out.
Step 3: Rest the Dough
Wrap the dough tightly in plastic wrap and let it rest at room temperature for at least 30 minutes. This step is crucial. Resting allows the gluten to relax, which makes the dough much easier to roll out through the pasta attachment.
You can also wrap the dough and refrigerate it overnight. This actually improves the flavor and texture of your homemade pasta with KitchenAid. Just make sure to bring it back to room temperature before rolling.
Step 4: Roll Out the Dough
Divide the dough into four equal pieces. This makes it much easier to handle. Take one piece and flatten it into a rectangle that fits through the pasta roller attachment.
Set your KitchenAid to speed 4 or 5. Feed the dough through the widest setting first. Fold it in half and feed it through again. Repeat this 3 to 4 times to develop a smooth, even sheet. Then gradually move to thinner settings, feeding the dough through once at each setting.
For most pasta shapes, you want to roll to setting 5 or 6 on the attachment. The dough should be thin enough to see your hand through slightly, but still strong enough to hold its shape when cooked.
Step 5: Cut Your Pasta Shapes
This is the fun part! Attach the appropriate cutter die to your roller attachment. Here are some popular shapes you can make:
- Fettuccine: Use the fettuccine cutter for wide, flat ribbons. Perfect for cream sauces.
- Spaghetti: The spaghetti cutter creates thin round strands that pair with any pasta sauce.
- Pappardelle: Extra-wide ribbons that look stunning with rich meat ragus.
- Linguine: Slightly thinner than fettuccine, great for seafood dishes.
- Lasagna sheets: Use the wide roller setting without a cutter for layered dishes.
After cutting, gently toss the pasta strands with a little flour to prevent sticking. Lay them out on a floured baking sheet or hang them on a drying rack.
Step 6: Cook Your Fresh Pasta
Bring a large pot of salted water to a rolling boil. Drop in your fresh pasta and stir gently. Fresh pasta cooks incredibly fast — usually just 2 to 3 minutes. You will know it is done when the pasta floats to the top and tastes tender but still has a slight bite.
Drain the pasta and toss it directly into your favorite sauce. Fresh egg pasta absorbs sauce beautifully, so do not be shy about using a generous amount of flavorful pasta sauce.
Popular Pasta Shapes You Can Make
One of the best things about using a KitchenAid for pasta is the variety of shapes you can create. Each shape pairs with different sauces and dishes. Here is a quick comparison:
| Pasta Shape | Best Paired With | Difficulty Level |
|---|---|---|
| Fettuccine | Alfredo, cream sauces, butter-based sauces | Easy |
| Spaghetti | Marinara, meat sauce, garlic and oil | Easy |
| Pappardelle | Ragu, bolognese, slow-cooked meats | Easy |
| Linguine | Seafood, clam sauce, pesto | Easy |
| Lasagna Sheets | Baked lasagna with cheese and meat | Medium |
| Ruffled Edges (Cannelloni) | Stuffed pasta dishes, baked casseroles | Medium |
Once you master the basics, you can experiment with more intricate shapes. Some KitchenAid pasta kits also include ravioli press attachments, which let you make stuffed pasta right at home. Imagine making fresh stuffed pasta shells or ravioli with your own dough — that is next-level cooking.
Tips for Perfect Homemade Pasta
Making great pasta takes a little practice, but these tips will help you get fantastic results from the start:
Use Room Temperature Eggs
Cold eggs can seize up the flour and create an uneven dough. Take your eggs out of the fridge about 20 minutes before you start. This small step makes a big difference in the smoothness of your pasta dough.
Do Not Skip the Resting Step
Resting the dough is not optional. It allows the gluten to relax and the flour to fully hydrate. Skipping this step often leads to tough, rubbery pasta that is hard to roll out.
Flour Lightly, Not Heavily
A light dusting of flour prevents sticking, but too much flour makes your pasta dense and heavy. Use just enough to keep things manageable.
Dry Your Pasta Before Cooking
If you are not cooking the pasta right away, let it dry for 15 to 30 minutes on a floured surface. This helps it hold its shape better when it hits the boiling water.
Save Your Dough Scraps
When you cut pasta, there will always be scraps. Do not throw them away! Roll them back together, rest briefly, and roll again. You can even use scraps to make pasta chips for a crunchy snack.
Storing and Freezing Fresh Pasta
One of the best things about making your own fresh pasta with KitchenAid is that you can make extra and store it for later. Here is how to keep your pasta fresh:
- Refrigerator storage: Lay your cut pasta on a lightly floured baking sheet, cover loosely with plastic wrap, and refrigerate for up to 2 days.
- Freezing: Spread the pasta on a baking sheet in a single layer and freeze until solid. Then transfer to freezer bags. Frozen pasta keeps for up to 3 months.
- Drying: Hang pasta strands on a drying rack in a well-ventilated area for 12 to 24 hours. Dried homemade pasta can be stored in airtight containers for several weeks.
When cooking frozen or dried homemade pasta, just add an extra minute or two to the cooking time. The result is still far superior to anything from a box.
Creative Ways to Use Your Fresh Pasta
Now that you know how to make homemade pasta with KitchenAid, let us talk about what to do with it. Fresh pasta opens up a world of delicious possibilities:
- Toss it with a simple garlic and olive oil sauce for a quick weeknight meal.
- Make a classic carbonara with eggs, cheese, pancetta, and black pepper.
- Use it in a baked pasta dish like lasagna or baked ziti with cheese and tomato sauce.
- Create a pasta salad by tossing cooked and cooled pasta with vegetables and a light vinaigrette.
- Serve it with roasted vegetables and a drizzle of olive oil for a lighter meal.
For more pasta recipe inspiration, you might enjoy our creamy kale pasta or our lemon and tuna pasta. Both of these recipes work wonderfully with fresh homemade pasta from your KitchenAid.
If you want to explore even more options, check out our chicken pasta recipes collection for family-friendly meals that pair beautifully with fresh pasta. And for a fun twist, try making pasta chips from your leftover dough — they make a great snack or appetizer!
Common Mistakes to Avoid
Even experienced cooks make mistakes when making pasta. Here are some pitfalls to watch out for:
- Using too much flour: This makes the pasta heavy and doughy. Add flour only as needed to prevent sticking.
- Skipping the resting time: Your dough needs time to relax before rolling. Patience pays off.
- Rolling the dough too thin: Very thin pasta breaks easily and turns to mush when cooked. Aim for a consistent medium thickness.
- Overcrowding the pot: Fresh pasta cooks fast and sticks together. Use a large pot with plenty of water.
- Rinsing the pasta after cooking: Rinsing removes the starch that helps sauce cling to the pasta. Skip this step.
Expert Insights on KitchenAid Pasta Making
Professional chefs and cooking instructors agree that a KitchenAid stand mixer with a pasta attachment is one of the most useful tools for home cooks. The attachment provides consistent rolling thickness, which is the secret to evenly cooked pasta with a great texture.
Many experts recommend starting with a simple egg pasta recipe and mastering the basics before trying whole wheat or gluten-free variations. Once you feel comfortable with the process, you can experiment with different flour blends, add herbs directly to the dough, or even create colorful pasta by mixing in pureed vegetables like spinach or beetroot.
The KitchenAid pasta maker attachment also opens the door to making filled pastas like ravioli and tortellini. While these require a bit more skill, the mixer handles the rolling perfectly, leaving you to focus on filling and sealing. It is a wonderful weekend project that will impress your family and friends.
Remember, making homemade pasta with KitchenAid is a skill that improves with practice. Your first batch might not be perfect, and that is completely okay. Each time you make pasta, you will get faster, more confident, and more creative with shapes and flavors.
Conclusion
Making homemade pasta with KitchenAid is one of the most rewarding things you can do in the kitchen. It is simpler than most people think, and the results are absolutely worth the effort. From mixing the dough to cutting beautiful ribbons of fresh pasta, your KitchenAid stand mixer handles the hard work while you enjoy the process.
Start with the basic egg pasta recipe, experiment with different shapes, and soon you will be creating stunning homemade meals that rival any Italian restaurant. The key is to have fun with it and not be afraid of a little flour on your counter.
So grab your KitchenAid, crack some eggs, and make your first batch of fresh pasta today. Once you taste the difference, you will never go back to store-bought again.
Frequently Asked Questions
Can I use a KitchenAid without a pasta attachment to make pasta?
Technically, you can use the flat beater to mix pasta dough, but you will need to roll and cut it by hand. The pasta attachment is what makes the process truly easy and consistent. Without it, you would need a separate rolling pin and knife or a hand pasta machine.
How long does homemade pasta last in the fridge?
Fresh homemade pasta keeps in the refrigerator for up to 2 days when stored properly. Lay it on a lightly floured baking sheet, cover it loosely with plastic wrap, and refrigerate. For longer storage, freeze it for up to 3 months.
Can I use semolina flour instead of all-purpose flour for my KitchenAid pasta?
Yes, you absolutely can. Semolina flour creates a chewier, more textured pasta that holds up well to hearty sauces. You can also use a blend of semolina and all-purpose flour for the best of both worlds.
What is the best way to cook fresh pasta made with KitchenAid?
Bring a large pot of generously salted water to a rolling boil. Add the fresh pasta and stir gently. Fresh pasta cooks in just 2 to 3 minutes. Taste it to check for doneness — it should be tender but still have a slight bite.
Can I make gluten-free pasta with my KitchenAid pasta attachment?
Yes, you can use gluten-free flour blends with your KitchenAid. However, gluten-free dough behaves differently and may need a bit more water. Start with small batches to get the right consistency before making a full batch.
Is making pasta with a KitchenAid worth the investment?
Absolutely. If you already own a KitchenAid stand mixer, the pasta attachment is a cost-effective way to make fresh pasta at home. It saves time, produces consistent results, and opens up a world of homemade pasta shapes and flavors that store-bought simply cannot match.