Master your kitchen and grill setup with these proven outdoor cooking tips that transform every meal into a flavorful experience. This guide covers everything from choosing the right grill and controlling heat to grilling vegetables, meats, and seafood like a pro. You will find practical techniques, common mistakes to avoid, and expert insights that make outdoor cooking simple and enjoyable for all skill levels.
There is something magical about cooking outside. The fresh air, the sound of sizzling food, and the aroma of smoke drifting through the yard make every meal feel special. Whether you are a seasoned griller or just starting out, a solid understanding of your kitchen and grill setup can take your outdoor cooking to the next level.
This guide is packed with practical tips, proven techniques, and honest advice that works for every budget and skill level. You will learn how to choose the right equipment, control your heat like a pro, and create delicious meals that your family and friends will love. Let us dive in and make your next outdoor cooking session the best one yet.
Key Takeaways
- Choose the right grill type: Gas grills offer convenience, while charcoal grills deliver authentic smoke flavor that elevates your outdoor cooking.
- Preheat and maintain your grill grate: A clean, properly heated grill prevents sticking and ensures even cooking every time.
- Master heat control: Understanding direct and indirect heat zones is the foundation of great grilling techniques.
- Use marinades and seasonings wisely: The right marinades add depth and tenderness to your grilled meats and vegetables.
- Keep your outdoor kitchen organized: Having the right grill tools and a clean setup makes cooking faster and more fun.
- Avoid common grilling mistakes: Overcooking, skipping the rest period, and neglecting grill maintenance are easy to fix with simple habits.
- Explore beyond basic grilling: Try grilling fruits, pizza, and even desserts to expand your outdoor cooking repertoire.
📑 Table of Contents
- Choosing the Right Grill for Your Outdoor Kitchen
- Essential Grill Tools and Setup Tips
- Mastering Heat Control and Grilling Techniques
- Grilling Vegetables, Seafood, and More
- Flavor Boosters: Marinades, Rubs, and Sauces
- Grill Maintenance and Safety
- Common Grilling Mistakes and How to Avoid Them
- Conclusion
Choosing the Right Grill for Your Outdoor Kitchen
Your grill is the heart of any outdoor kitchen. Picking the right one depends on your cooking style, budget, and how much space you have. There are three main types to consider, and each has its own strengths.
Gas Grills: Convenience Meets Control
Gas grills are the most popular choice for home cooks. They heat up fast, and you can adjust the temperature with a simple turn of a knob. This makes them perfect for busy weeknights when you want to throw dinner on the grill without a long setup.
Most gas grills run on propane or natural gas. Propane tanks are easy to swap out, and natural gas lines offer a steady supply if you have one connected to your home. The downside is that gas grills do not produce as much smoke flavor as charcoal models. However, you can add smoke boxes or wood chips to bridge that gap.
Charcoal Grills: Authentic Smoke and Flavor
If you want that deep, smoky taste that defines great outdoor cooking, a charcoal grill is hard to beat. Charcoal burns hotter than gas and creates a unique flavor profile that gas simply cannot replicate.
The trade-off is patience. Charcoal grills take longer to heat up, and managing the fire requires a bit of skill. You will need to learn about airflow, coal arrangement, and fire management. But once you master these basics, the results are worth every minute of effort.
Electric Grills: The Clean and Easy Option
Electric grills are a great choice for apartment balconies or small patios where open flames are not allowed. They are easy to use, simple to clean, and heat up quickly. Electric grills do not produce smoke or flare-ups, which makes them very beginner-friendly.
The downside is limited flavor. Electric grills cannot reach the high temperatures of gas or charcoal, so you will not get the same char marks or smoky depth. They work best for quick meals like grilled sandwiches, vegetables, and thin cuts of meat.
Essential Grill Tools and Setup Tips
A well-organized outdoor kitchen makes cooking smoother and more enjoyable. You do not need a huge collection of tools, but having the right ones makes a big difference.
Must-Have Grill Tools for Every Cook
Start with the basics. A sturdy pair of long-handled tongs lets you flip food safely without getting too close to the heat. A spatula with a thin edge slides under burgers and fish without breaking them apart. A grill brush keeps your grill grate clean, which prevents food from sticking.
Other essentials include a meat thermometer, heat-resistant gloves, and a grill basket for smaller items like vegetables and shrimp. A drip pan catches excess grease and makes cleanup much easier. Keep all your tools in a caddy or nearby shelf so they are always within reach.
Setting Up Your Outdoor Kitchen Space
Your grill setup matters more than you might think. Place your grill on a flat, stable surface away from fences, trees, and overhanging branches. Good airflow is essential for both safety and cooking performance.
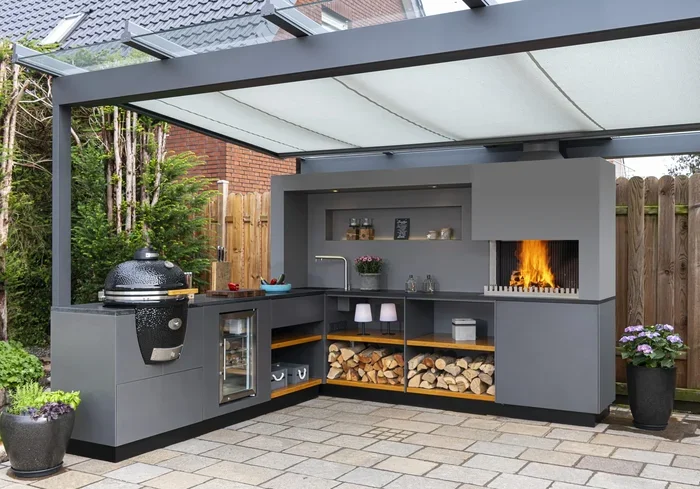
Consider the layout of your outdoor kitchen carefully. Keep your prep area close to the grill so you can move food on and off quickly. Have a trash bin and a wash station nearby to keep your workspace clean. A small shelf or cart next to the grill holds spices, sauces, and plates within arm’s reach.
Preheating Your Grill the Right Way
One of the most overlooked grilling tips is preheating. Always heat your grill for at least 10 to 15 minutes before cooking. This burns off residue from previous uses, sterilizes the grate, and ensures even heat distribution.
For gas grills, turn all burners to high and close the lid. For charcoal grills, light the coals and wait until they turn white and ashy on the outside. This signals that they are ready for cooking. Skipping this step leads to uneven cooking and food sticking to the grate.
Mastering Heat Control and Grilling Techniques
Controlling heat is the single most important skill in outdoor cooking. Once you understand how heat works on your grill, you can cook almost anything with confidence.
Direct Heat vs. Indirect Heat
Direct heat means cooking food directly over the flame or coals. This method is ideal for quick-cooking items like burgers, steaks, sausages, and thin fish fillets. The high heat sears the outside and creates those beautiful grill marks we all love.
Indirect heat means cooking food away from the direct flame source. This is perfect for larger cuts like whole chicken, ribs, and roasts that need longer cooking times without burning. On a gas grill, turn off one side of the burners and place the food on the cooler side. On a charcoal grill, push the coals to one side and cook on the other.
Managing Grill Temperature
Understanding your grill temperature is crucial for consistent results. Most grills have hot spots and cooler zones, so learning to work with these variations is a game-changer.
Use the hand test to estimate heat levels. Hold your hand about three inches above the grate and count how many seconds you can hold it there. Two to three seconds means high heat, four to five seconds is medium-high, and six to eight seconds indicates medium or low heat. This simple trick helps you place food in the right zone every time.
Grilling Techniques That Produce Great Results
Start with clean hands and a clean grate. Oil the grate lightly with a paper towel dipped in vegetable oil before placing food on it. This simple step prevents sticking and makes flipping much easier.
Resist the urge to press down on burgers with your spatula. Pressing releases juices and dries out the meat. Let the food cook undisturbed for a few minutes before flipping. Most items only need one or two flips for the best results.
For thicker cuts of grilling meat, consider searing over high heat first and then moving to indirect heat to finish cooking. This method gives you a flavorful crust on the outside while keeping the inside juicy and tender.
Grilling Vegetables, Seafood, and More
One of the joys of outdoor cooking is the variety of foods you can grill beyond just burgers and hot dogs. Expanding your menu keeps things exciting and adds healthier options to your meals.
Grilling Vegetables Like a Pro
Vegetables are fantastic on the grill. They caramelize naturally, bringing out sweet and smoky flavors that pair beautifully with any main dish. Zucchini, bell peppers, corn, mushrooms, and eggplant are all excellent choices.
Cut vegetables into uniform sizes so they cook evenly. Brush them lightly with olive oil and season with salt, pepper, and herbs before placing them on the grill. Use a grill basket or skewers for smaller items that might fall through the grate. Grilled vegetables work wonderfully in salads, pasta, and as side dishes.
For a simple and delicious side, try a veggies and beans recipe that incorporates grilled vegetables into a hearty, satisfying meal. The smoky flavor from the grill adds a whole new dimension to these dishes.
Grilling Seafood and Fish
Seafood on the grill is a true treat. Shrimp, salmon, and fish fillets cook quickly and absorb smoky flavors beautifully. The key is not to overcook them. Fish becomes dry and flaky when left on the heat too long.
Use a grill basket or foil packet for delicate fish fillets that might break apart on the grate. Shrimp can be threaded onto skewers for easy handling. A light marinade adds flavor and helps protect the delicate flesh from drying out.
For a stunning summer meal, try lemon and prawn spaghetti with grilled prawns on top. The smoky char on the prawns paired with the bright lemon flavor creates a dish that tastes like a vacation on a plate.
Grilling Meat and Poultry
Meat is the star of most grilling sessions. Steaks, chicken, pork chops, and sausages all benefit from a little extra attention before they hit the grill.
Always bring meat to room temperature before cooking. This ensures more even cooking throughout the piece. Pat the surface dry with paper towels before seasoning, as moisture on the surface creates steam instead of a good sear.
For chicken, use a meat thermometer to check the internal temperature. Chicken is safe to eat at 74 degrees Celsius or 165 degrees Fahrenheit. For steaks, pull the meat off the grill a few degrees before your target temperature and let it rest. The temperature will continue to rise as the meat rests, giving you the perfect level of doneness.
For a classic grilled dinner that always impresses, try steak and chips cooked over direct heat. The high flame creates a beautiful crust on the steak while the chips cook to crispy perfection on the side.
Flavor Boosters: Marinades, Rubs, and Sauces
Seasoning is where you can really personalize your outdoor cooking. The right combination of flavors turns simple grilled food into something memorable.
Marinades: Tenderizing and Adding Flavor
Marinades do two important jobs. They add flavor to the surface of the food, and the acid in marinades helps tenderize tougher cuts of meat. Olive oil, citrus juice, vinegar, yogurt, and wine all work as effective marinade bases.
Marinate meat for at least 30 minutes, but overnight gives the best results. Be careful with very acidic marinades, as too much acid can break down the meat texture and make it mushy. Two to four hours is the sweet spot for most cuts.
Dry Rubs for a Perfect Crust
Dry rubs create a flavorful crust on grilled food. Mix together salt, pepper, garlic powder, paprika, cumin, and brown sugar for a versatile rub that works on almost any meat. Apply the rub generously and let it sit on the meat for at least 15 minutes before grilling.
The sugar in the rub helps with caramelization, creating those dark, flavorful edges that everyone loves. For a simple but effective rub, combine salt, pepper, and garlic powder. Sometimes less really is more.
Sauces: Add Them at the Right Time
Sauces with sugar burn easily on high heat. Apply sweet sauces like barbecue sauce during the last few minutes of cooking. This gives them time to thicken and stick to the food without turning into a sticky mess.
For a tangy option, try a sweet and tangy sauce brushed on during the final minutes of grilling. The balance of sweet and acidic flavors cuts through the richness of grilled meat and adds a bright, refreshing finish.
Grill Maintenance and Safety
Taking care of your grill keeps it performing well for years. Regular maintenance also improves food safety and makes every cooking session more enjoyable.
Cleaning Your Grill After Each Use
Clean your grill while it is still warm. This makes the job much easier because residue comes off more readily. Use a grill brush to scrub the grate and remove any stuck-on food particles.
Empty the grease tray after every few uses. Built-up grease can cause flare-ups and even grease fires. Wipe down the exterior with a damp cloth and mild soap. For gas grills, check the burners for clogs and clear any debris from the ports.
Seasoning Your Grill Grate
Seasoning your grill grate is similar to seasoning a cast iron pan. After cleaning, apply a thin layer of vegetable oil to the grate while it is still warm. This creates a non-stick surface and protects the metal from rust.
For charcoal grills, replace the charcoal regularly. Old charcoal burns inconsistently and can impart off-flavors to your food. Store charcoal in a dry place to keep it ready for your next cooking session.
Grill Safety Basics
Safety should always come first when using a grill. Keep a fire extinguisher nearby and never leave a lit grill unattended. Make sure your grill is on a stable surface and never move it while it is hot.
For gas grills, check the hose connections for leaks before each use. Apply a soapy water solution to the connections and look for bubbles. If you see bubbles, tighten the connection or replace the hose. Keep children and pets away from the grill area, and always turn off the gas supply when you are done cooking.
Common Grilling Mistakes and How to Avoid Them
Even experienced cooks make mistakes. Knowing what to avoid saves time, food, and frustration.
Not Letting Meat Rest After Grilling
Resting meat after grilling allows the juices to redistribute throughout the cut. If you cut into a steak immediately, the juices run out and the meat becomes dry. Let your meat rest for five to ten minutes under a loose tent of foil before slicing.
Overcooking Food
Overcooking is the most common grilling mistake. The difference between perfectly cooked and dry, tough food is often just a minute or two. Use a meat thermometer instead of guessing. It removes the uncertainty and takes the guesswork out of grilling.
Skipping the Preheat
A cold grill causes food to stick and cook unevenly. Always preheat your grill for at least 10 minutes. This simple habit improves your results every single time you cook outside.
Using the Wrong Fuel or Charcoal
Not all charcoal is the same. Avoid charcoal briquettes that contain added chemicals or fillers. Natural lump charcoal burns cleaner and produces better flavor. For gas grills, always use the fuel type recommended by the manufacturer.
Conclusion
Outdoor cooking is one of life’s greatest pleasures, and mastering your kitchen and grill makes every session better. From choosing the right grill type and organizing your outdoor kitchen space to controlling heat and experimenting with new flavors, these tips give you everything you need to cook with confidence.
Start with the basics and build your skills gradually. Try new techniques, experiment with different foods, and most importantly, have fun with it. The best grill sessions are the ones shared with good people and great food. Fire up your grill, grab your favorite tools, and enjoy the wonderful world of outdoor cooking.
Frequently Asked Questions
What is the best grill for beginners?
A gas grill is the best choice for most beginners. It heats up quickly, temperature control is simple, and there is no messy ash cleanup. Start with a basic two-burner model and upgrade as you gain confidence in your outdoor cooking skills.
How do I know when my grill is hot enough?
Use the hand test by holding your palm about three inches above the grate. Count the seconds you can comfortably hold it there. Two to three seconds means high heat, four to five seconds is medium-high, and six to eight seconds is medium or low heat for slower cooking.
Should I oil the grill grate before cooking?
Yes, always oil your grill grate before cooking. Use a paper towel dipped in vegetable oil and tongs to spread a thin layer across the grate. This prevents food from sticking and makes flipping much easier, especially for delicate items like fish and vegetables.
Can I grill vegetables on any type of grill?
Absolutely. Vegetables grill beautifully on gas, charcoal, and electric grills. Use a grill basket or skewers for smaller pieces, and brush them with oil to prevent drying out. Grilled vegetables pair perfectly with any protein and add a smoky, caramelized flavor to your meals.
How long should I let meat rest after grilling?
Most meats benefit from a five to ten minute rest after grilling. This allows the juices to settle back into the meat, resulting in a juicier and more flavorful bite. Tent the meat loosely with foil to keep it warm while it rests.
What is the difference between direct and indirect grilling?
Direct grilling means cooking food directly over the heat source, which works best for quick-cooking items like burgers, sausages, and steaks. Indirect grilling means cooking food away from the direct flame, which is ideal for larger cuts like whole chicken and ribs that need longer, gentler cooking times.